Friday, December 30, 2011

The Best of Share Dessert Company 2011

Wow! Time flies so incredibly fast. 2011 is over!
I began my humble little blog a year ago and can't believe how far it has come since then, especially in the last two months.
There were so many great projects and desserts I had fun with that it is hard to pick my favorites.
Let's take a look at (some of) The Best Of 2011!

Winter Wonderland Birthday Party

Pink and Blue Cake Pops
Mardi Gras Cake Pops

Pink Ruffle Cake

St. Patrick's Day Mint Truffles

Pumpkin Chocolate Chip Bread

Red Velvet Cake Pops

Fresh Strawberry Cupcakes
Chocolate Salted Caramel Macarons

Fancified Oreos

Monster Mash Birthday Bash Dessert Table
Beach Ball Cake Pops

I can't wait to see what 2012 has in store for
Share Dessert Co!

What was your favorite post of 2011?!

25% Off TomKat Studio Paper Party Designs

Do you love crafty parties but aren't the kind to make tags and cupcake toppers yourself?!
Well, You're in luck! The TomKat Studio has some REALLY cute paper party designs
and they are 25% OFF through Dec 31, 2011!
That's tommorrow!
Go check it out! Her blog is full of lots of fun ideas. 

Tuesday, December 27, 2011

Let's Talk Fudge {Eggnog Fudge Recipe}

So. Let's talk Fudge.


First off, what is fudge?
 Fudge is made of butter, sugar and cream (plus flavoring at the end) that is heated and allowed to cool to produce a crystallization of sugar molecules. This crystallization gives us a deliciously smooth texture from a firm solid fudge.
So why is it so hard to make?  Chemistry. Physical Chemistry.
Especially in the cooling phase.
Let's dive in.


1.} One of the best ways to make a fabulous fudge is to invest in a good candy thermometer. Yes, you specifically want a candy thermometer. I use one like this:

The reason I like this one the best is because of the metal frame surrounding the actual thermometer. It allows you to just set it in the pot and not worry about it touching the bottom of the pan and reading hotter than the candy actually is. Any candy thermometer will work though. They are not expensive so go get one.
You might want to test your thermometer to make sure it is working acurately before you start your fudge. Do this by boiling some water and using the thermometer to check the temperature and see if it is correct. Water boils at 212 degress at sea level and 205 degrees at 4,377 feet above sea level (Centerville, Utah 4,377 feet).
I had a faulty thermometer with this batch of fudge actually.... it read up to 220 and then started to drop a bit and then stayed there.....forever. Broken. Blagh. So pay attention and if your thermometer seems like it might be acting funny..... it might be acting funny.
Another piece of equipment you need is a good heavy pan....meaning not a flimsy thin one. Heavy pans distribute heat more evenly and are less likely to produce "hot spots" that can cause your candy to burn. Candy boils up so it needs to be about twice the volume of your batch as well.

2.} Second thing you should do is figure out what your "soft ball temperature" is at your elevation depending on where you live. If you are at sea level then you don't need to adjust but the more elevation you gain, you will want to compensate. Let's discuss.
I am in Utah. almost 4,500 feet above sea level.
Where I live there is a lower air pressure than at sea level.
Fact: The farther away from sea level you get....air pressure is decreased.
When you have a lower air pressure, you have less pressure being exerted on the water (and a decreased surface tension.) This causes your liquid to boil at a lower temperature (and faster) because bubbles on the bottom of the pan can escape easier than they would at a higher air pressure. This applies to any liquids you would use in cooking candy.

Conclusion: The higher elevation you live at, the lower your "soft ball" temperature is going to be.

Note: Many thermometers might say "soft ball" instead of 240 degrees (referring to sea level temps). Ignore this soft ball prompt if you need to adjust your temperature due to elevation.
So, what temperature should I be using?!
It is easy to figure this out. Put your candy thermometer in a pot of water and bring it to a boil. The reading on you thermometer is the temperature at which water boils at your elevation. Now subtract that from 212 and you get the difference of temperature (in degrees) between sea level and where you live.
From now on, all of your candy recipes should be adjusted down by this difference.

For example. Water here in Utah boils at 205 degrees 
212 (sea level)-205 (Utah) = 7 degrees difference
My soft ball stage will be:
240 (soft ball at sea level)-7 (difference at my elevation) = 233 degrees

3.} When your candy is boiling, wash down the sides of the pan with a pastry brush dipped in water. This will wash the sugar crystals into the candy while it is still cooking. If these sugar crystals are allowed to get into the candy after you have reached soft ball stage and finished your cooking, it is then called a "seed". "Seed" meaning it will start a sequence of crystallization and will cause a few large crystals to form in your fudge (Bad).

4.} Next tip for making fudge is to consider "agitation". This might include anything from stirring to vigorous swirling. Agitation after your sugar has reached soft ball stage temperature will actually promote crystallization (or connecting) of the sugar molecules. Crystallization is good because that is what forms the structure to your fudge, HOWEVER, by stirring before it cools you are promoting a fast crystallization of large crystals.

Large crystals = Grainy Texture
Grainy Texture = Bad
Small Crystals = Smooth Texture
Smooth Texture = Good!


Therefore....
Vigorous stirring after soft ball stage and while the candy is still hot is Bad!

Wait until the candy has cooled down to about 110 degrees before you stir. The cooling prevents seed crystals from forming. Read on...

5.} When pouring your candy out of the pot, don't scrape the sides because it likely has chunks of sugar on it and these chunks will act as seeds (Bad).
6.}Next up, Marshmallow!
You may notice that a lot of recipes call for marshmallow creme! What the heck?
Well, the marshmallow creme is used as the support (and a kind of fluffy "seed") of the fudge and coats the dissolved sugar molecules to stop them from turning into large sugar crystals.
Corn syrup also helps with this. It contains different types of sugar molecules (glucose, fructose and maltose)  than sugar (sucrose) and it interferes with the crystallization of sucrose by stepping in between the sucrose molecules, therefore it does not allow large chunks of sugar to be formed easily.(Good!)
If too much of this ingredient is added then the fudge will not set up and become solid. (Bad)

So why do I need to let it cool? The candy actually becomes 'supersaturated' as it cools. It is not fully saturated at 240 degrees (or your adjusted temperature). As it cools, this solution becomes highly unstable and will crystalize at the drop of a dust particle! This is what allows the sudden stirring to produce a million tiny little seed crystals all at once. If you were to stir the candy while it is hot, you would produce few large crystals and they would get bigger as they cool, creating a grainy fudge.

7.} After you let your fudge cool to lukewarm (touchable), your liquid candy is in a "super-saturated" state meaning it can no longer absorb any more sugar. This liquid is so packed with sugar and so saturated that it is just waiting to start crystallizing (to become a more stable solution....chemistry term). So, let the stirring commence. This starts the crystalization process all at once throughout all the candy. Continuous stirring at the appropriate time (now) allows a bunch of mini crystals to form at the same time and start the crystallization properly. All of these little starts are competing for more sucrose molecules (the dissolved sugar) to attach on to but they can't grow very large because of the competition from other crystals that were started at the same time. This creates a lot of tiny crystals and remember:
Small Crystals = Smooth Texture = Good
The candy will change from shiny to dull as you stir. Once it is fairly dull, this means the crystals are well formed and it is time to stop. This usually takes a few minutes.

8.} Allow fudge to cool at room temperature. DO NOT REFRIGERATE or try to speed up the process. Doing this will encourage large crystals and a grainy texture for the same reasons described above.
If you think this is awesome like I do and want to read more about the physics and chemistry behind fudge, see the article below for a more indepth view.

So now you know the secrets to making fabulous fudge!
Go make some for gifts!


Just grab a gift box of any size and stuff it full of fudge.


Wrap it with a pretty bow and voila!
Happy people are soon to be!


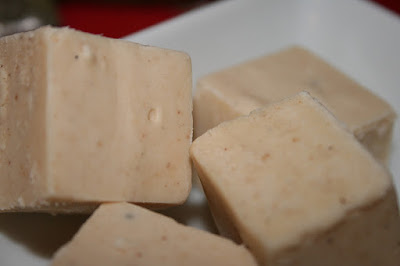
Eggnog Fudge

Yield: 64 pieces
Prep Time: 20 minutes

2 cups granulated sugar
½ cup unsalted butter
¾ cup eggnog
Pinch of salt
10½ ounces white chocolate morsels (plus extra for marbling if desired)
½ teaspoon freshly grated nutmeg
One 7-ounce jar marshmallow creme
1 teaspoon rum extract 

Line an 8-inch square pan (or any other size you want) with parchment paper and let it hang over the side; set aside.

In a heavy 3-quart saucepan, combine the sugar, butter, eggnog and salt over medium heat. Bring to a rolling boil, stirring constantly. Continue boiling 8 to 10 minutes only stirring if needed to prevent scorching, until a candy thermometer reaches your soft ball stage (233 degrees F for me). During the boiling, brush down the sides of the pan with a pastry brush dipped in water to dissolve all the crystals. Once to soft ball stage, remove from heat.
Using a wooden spoon, work quickly to stir in white chocolate morsels and nutmeg until chocolate is melted and smooth. It will be very thick at this point. Stir in the marshmallow creme and rum extract. Stir until well blended and uniform and then pour into your prepared pan. If desired, put some white morsels into a zip lock bag and with the bag open microwave at short intervals, mixing each time, until chocolate is melted. Then close the top and snip off the corner tip. Draw lines across the fudge parallel to each other about 1-2 inches apart. Take a toothpick and drag perpendicular to the line from one side to the other. Switch directions and drag the opposite way about an inch away. Repeat until done. Let stand at room temperature until cooled and firm (hours).

When firm, cut into squares of your desired size. Store in a covered container. If keeping for longer than few days, refrigerate covered for weeks.
{Recipe adapted from RecipeGirl}



Meet Candy Thermometer

I want to introduce you to a friend of mine.

Candy thermometer, meet foodie. Foodie, meet candy thermometer.
Great. Now that formalities are out of the way....


Christmas (and the season surrounding it) is a great time to pull out your thermometer (or go buy one).
So get ready because I will be posting a few recipes that require a candy thermometer (or at least it makes things a lot easier).

I really love this model (shown above) because you can just set it in the pan or pot without worrying that the bottom of the thermometer is touching the pan. I love it. I think I am going to get a few to have on hand just in case. This is one of those life changing tools you come across that just put your mind at ease and make cooking fun! It's only around $12 and well worth the investment.
Don't forget to share all those treats that you make with your neighbors and family!
They will LOVE you for it!

Sunday, December 25, 2011

Merry Christmas


Merry Christmas Everyone!

It's the time of year to show everyone how much you love them and show them your appreciation for who they are. Personally, I think nothing does this better than a homemade gift with a little bit of thought put into it. It doesn't have to be expensive or fancy but just something that will make them feel special because you put time into doing something for them personally.

As I was making Chocolate Penuche yesterday, I reflected on this very thing. I have a lot of things going on and asked myself, "Why do I try to do so much every Christmas?"
The answer immediately hit me. It was because I love to make other people happy.
Everything I was doing was to bring a smile to someone's face. My own christmas tree and decorations never even got put up this year. I got the lights on the house and a tree because that's all the hubby cared for and that was it. And I was ok with that because it's not what matters to me.
As I added the vanilla to the melted candy I realized that I love to do this (make candy and desserts) and I love to make it for people and share my love with others who I feel will love it too.
Isn't this the best part of Christmas? The giving? The sharing?
It is for me.

So go ahead and whip up a batch of toffee or candies. Delicately tie it with a beautiful bow, attach a homemade tag with a short sweet message on it and watch their eyes brighten as they see your gift of self that you have created specifically for them. These are the gifts we remember.

I love this quote that I used last year on my Christmas tags.


Christmas means 'giving,' and the gift without the giver is bare. Give of yourselves; give of your substance; give of your heart and mind. ~ President Gordon B Hinckley

The meaning of Christmas is sharing, for charity is the pure love of Christ.

So my message to you is this:
In all that we do, let it be for others.

Thursday, December 22, 2011

Caramel-of-the-Month Club

Need a last minute gift?!
I think this one is absolutely awesome for anyone with taste buds.....I would LOVE it!


Please tell me who would not want to receive a delicious looking log of
 gourmet caramel once a month?!
AND they are having a SALE right now so you could get 6 months of caramel bliss
for $60 plus shipping.
Oh my heavens! Look at that smooth chocolate . Mmmm.....
Check it out if you are interested!

Sunday, December 18, 2011

Q and A ~ Crumbly Rolled Sugar Cookie Dough

Question:
"I need your help! I wanted to make some sugar cookies and try to decorate them for neighbor gifts… so I made some dough and I don't know what I did to it but it is so crumbly and dry… I used the 6 cups of flour but maybe I went a little on the heavy side of 6 cups? Do you think? Any suggestions from the dessert guru?"
~Teresa

Answer:
"Hi Teresa!
So it does sound like too much flour was added to the dough but luckily you can fix it fairly easily.
There are 2 methods you can try depending on how much your dough is crumbling:

Method #1-  I have found that when my dough is slightly crumbly and kind of falling apart (but not way too much), it helps to wad it up as tight as you can in a ball (slightly kneading it), wrap it in plastic wrap and refrigerate it overnight or at least quite a few hours (more than 5 hrs). Then take it out and roll it when it warms up just enough. It might just need a small amount of kneading. I had the exact same thing happen to me with some dough and this worked quite well. I believe that letting it have some time to sit allowed the moisture to spread throughout the dough and make it more uniform.

Method #2- If you have already tried to let it sit refrigerated and it is still crumbly or your dough is super crumbly to begin with then try sprinkling a small amount of cold milk or water and mixing it in just enough. I don't want to tell you exactly how much because it depends on how much dough you have and how dry your dough is. Start with a little (less than 1 Tbsp) and reassess adding just enough liquid to make the dough come together. You don't want to knead it way too much because then the cookie can become tough.

Next time you make the dough you will want to add less flour. You won't believe how much of a difference your measuring method makes. Assuming that we are using all-purpose flour, I have listed the estimates of how much your flour weighs for different methods of measuring.

Dip and Sweep Method = 5 ounces per cup
Lightly Spooned = 4.5 punces per cup
Sifted = 3.75 ounces per cup
 
 
Big Difference! This is why I like to use a scale because it gives you reliable consistent results every time. I use the OXO Kitchen Scale and have been extremely happy with it but you can get a cheaper one and it will do well too. It may just have less bells and whistles.
If you do not have a kitchen scale, then I would recommend using the lightly spooned method if the recipe does not specify (which most often they do not).
Does this help? Good Luck!"

Friday, December 16, 2011

Winter Wonderland Red Velvet Cake

Winter Wonderland Party Part Deux
Red Velvet Polka Dot Cake


This was the first buttercream smoothed cake I have done and I learned A LOT of techniques regarding how to get a smooth cake surface. This one did not turn out as I was hoping and I will explain why.
Still cute though....


Problem 1: Wrong type of buttercream! To do the technique I wanted to try, you need to have a "crusting" buttercream meaning it will crust and become... well.... crusty when it dries. I had hurricane winds at my house this week and was out of power for a while so I kind of ran out of time (and energy) to make my own buttercream from scratch (a crusting one). I actually used store bought frosting ...which does not crust well might I add. It is actually rather sticky. So, yeah, a bit of a headache for someone who was inexperienced at smoothing cakes. So I did my best. It is ok, but not at all what I wanted. I wanted to use the paper-towel method, which I will explain better next time when I can do it right... grrr. Here is a video of what I was trying to do...

The Paper Towel Method for Smoothing Buttercream


Problem 2: I had no non-patterned paper towels. I have now vowed to only buy non-patterned paper towels so that when I need a smooth buttercream cake....I can have one. Before I discovered I had the wrong icing, I went ahead with the plan. But wait, dilemma....I've got a quilt for a paper towel. This did not turn out a pretty smooth buttercream (yes, I tried). So I attempted to use parchment paper instead. In a pinch, it could work but it was sliding all over the place and not cooperating. Paper towels could just form to your cake but parchment paper is just stiff and a pain. Save it for emergencies.

Problem 3: When starting to pipe borders.....start in the back. Being an inexperienced cake decorator as of right now, my borders were less than perfect. I don't know why I didn't start in the back first so I could smooth out my groove by the time I got to the front. ...And then I accidentally did it again on the bottom border...gah. Live and learn.
Another reason why I am not liking store bought frosting for cakes is that it is difficult to pipe because of the stickiness. When I let go of the pressure and pulled away, the icing stuck to the tip and stretched out instead of breaking away. Not useful. Another demerit for store bought frosting.

Ok, so now that the "things-to-consider-when-decorating-your-cake" speech is over,
On to The Making Of....
Bake this red velvet cake according to the recipe. Make three 8 inch round cakes. I made 2 batches of this recipe and the extra batter went to cake pops for my last dessert post! Efficiency at its finest.
When cool, wrap them in plastic wrap and throw them in the fridge overnight or until they are cold and firm. Get out your cake decorating twirlybob stand and a 10 inch cake board circle for the cake to go on.
Tip: Go get the cake board... it's like $0.20. You will be saved from the headache of having to man-handle your cake and ruin it. They have them at common supermarkets.
Next, level your cakes. If you have a cake leveler tool then your life will be easy (and I will assume you know how to use it for now). If you don't, like moi, then you get to eyeball it. Using a long serrated knife, cut the dome off the top of the cake so it is flat. Get down to its level and look to see if there are any raised areas and do your final adjustments. Do this for all your cakes.

Get your frosting ready. Any crusting buttercream frosting will do. (huh...I've never posted my buttercream frosting recipe. weird. I'll do that.)
Now, take some frosting and smear it on the cake board where the cake will sit. This is going to act as glue so the cake isn't sliding all over your cake board. Take a cake and place the flattest side up (probably the one that was against the pan). Using an offset spatula, smooth a thin layer of frosting onto the top of the cake. Stack another cake and frost again. Stack the last cake with the flattest side up. This will be important at this stage because this is the top of your cake!

Look to see if the sides of your cake are lined up straight. If there are any parts that are protruding out you can use the knife to gently cut them off to create a smooth side to the cake.
We are now going to give your cake a "crumb coat".
This is a very thin layer of icing that captures all the loose crumbs, therefore the name.
To do this, thin out some of your "Top Coat" frosting with water. It should be thin so it is very easily spreadable but not soo thin that it drips down the cake. Using a spatula, take some of the frosting and place it on top of the cake. Spinning the cake on the twirlybob, spread the icing out over the whole top of the cake. Instead of lifting up on the spatula to take it off the frosting, which can cause more crumbs, try dragging or sliding it off sideways. If there is excess icing then push it over to be used on the side. This coating does NOT need to be pretty. We will be covering it up later. The goal is just to capture all the crumbs in a thin icing coat.
Let this dry. I prefer to let it dry in the fridge to firm up the cakes a bit just because it seems a little easier to work with after but it's not necessary.
Now we are ready to frost the cake for real. Take a big dollop of frosting with your spatula and place on top of the cake. Smooth it out as much as possible but you don't need to take too much time on it. We will smooth it out more later. Do the same thing along the sides. Having the crumb coat makes it so you don't rip up cake chunks during this process. Fill in any holes to create a relatively smooth surface. Now you are going to let this dry for about 15 minutes or until it crusts. Test to make sure it is dry by gently touching your finger to the cake. It should not stick at all but feel soft and dry to the touch. Now you will want to contine on with the paper towel method for smoothing the buttercream surface shown in the video above.
Once your buttercream is completely smooth you can move onto the decorations. Start with the piping. I used a 1/2 inch plain round tip for the borders. This is a plain bead border. You can make the bead any size you want. Just hold and press longer for a bigger bead like around the bottom of the cake. Evenly space round dots around the cake, as many or as few as you like, You can insert candy canes or other decorations into your cake by cutting a very thin slice of cake out with a small knife. This gives a small space big enough for the candy cane to stick into. Then I just stuck a few decorated sugar cookies into the icing. Done!


Cute Winter Wonderland Cake!

Wednesday, December 14, 2011

Winter Wonderland Birthday Party {Decorated Sugar Cookies, Cake}
Christmas is right around the corner! I can't believe it!
Nothing fits a December birthday better than a Winter Wonderland Birthday party!
This party was inspired by Fresh Chick's Winter Candyland birthday party theme.
My friend organized this birthday party for her 3 year old daughter and it turned out super cute.
{Complete picture added to the end}
She went with a variety of winter cookies and a cake!

I love these little penguin cookies! In all honestly, these were super easy cookies to make.
The key is to make sure to add enough black food coloring to get a good true black color.
Hint: Your icing will get darker as it sits so your icing may look like a dark grey to begin with (like mine did) and will 'mature' into a black color like these penguins. You can let it sit for a short time and see if it darkens or you can just get it a dark grey and go to town. You don't need to add enough color to get it black right away.


For these cookies, use this rolled cookie dough recipe and roll out to 1/3-1/2 inch thick. Use an oval cookie cutter of your size choice to make the cookie base. Let them cool completely before decorating.
Make this royal icing recipe and thin it out to a medium consistency to be able to both pipe borders and flood. Separate the icing out into separate bowls to tint to the correct colors (black and orange). Use a water-based food coloring. I prefer gel colors because it doesn't thin your icings out. You don't need much orange at all. Put your icing in squeeze bottles for easy application. I put my orange in a little ziplock baggie and snipped the tip off.


Pipe a border around the edge of the cookie creating an oval then flood the cookie with the black icing. Give it a shake to even out the icing. Move on to the next cookie. I leave my cookies out on a cookie sheet. The icing will keep the cookies moist so don't worry about refrigerating or covering while decorating your cookies. Let the icing dry enough so that it looks more dull than shiny (It might be ready by the time you finish the rest of your cookies). A little shine is ok as long as it looks firm enough to pipe more icing on and not sink in or bleed. Once dry enough, pipe a border of the white icing to duplicate the white pattern that you see below and then flood it. Allow this icing to dry in the same manner. Make sure you are capping or covering your squeeze bottles in between use so the icing doesn't dry out.
Next, give him some eyes with just a small dab of icing and give hime some wings. I just press and released as I pulled away. I then used a little toothpick to make it look like I wanted. Now give Mr Penguin some feet and a nose. The tip opening should be very small so you can control the icing. Just do a little triangle for the nose and the design you see below for the feet. I used a little toothpick on the nose if it didn't turn out how I wanted it. Voila! Penguin. Fer cute!
Who doesn't love penguins, honestly?


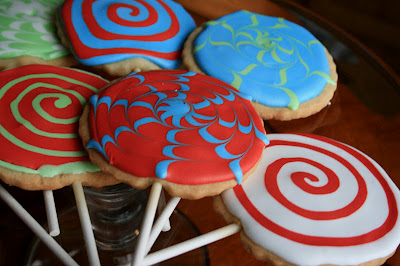
Next up are Cookie Lollipops!
What?! But lollipops have sticks?! ...and so can cookies. Very easily might I add.
I wish I had taken a picture of the cookie making process for these lollipops but I didn't so this explanation will have to do for now.


The Stuff List: Same cookie dough recipe and 6 inch lollipop sticks....That's it.
Roll these out the same way and cut into circles (whatever size you want them to be). Mine are 3" cookies. Now take your stick and press it lightly onto the top of the cookie extending at least to the center of the circle. You don't want your cookie to fall apart because the stick wasn't in enough. Now get a bit of dough and roll it into a ball. Flatten it with your fingers and place over the stick. The dough should cover the stick and quite a bit around it so it will be secure and snug. Very lightly press the cookie dough disc flattening it to the cookie. Press the edges so they kind of blend with the cookie. ( ...I should do a video. I will someday I promise!)
Using a thin metal spatula, carefully flip the cookie over, place on an ungreased cookie sheet and cook as directed by the recipe. Not too bad. The cookies are suprisingly sturdy. I thought they might be crumbly or fragile but they are quite solid. Let cool completely on the cookie sheet before removing.


To get this cool design above, flood your cookie as described above with red icing. Immediately after, draw four lines, with blue icing, across the cookie crossing in the middle. Using a toothpick, start in the middle of the cookie and swirl around circling the cookie about 5 times. Shake gently.....notice the blue and red cookie in the background above.....I shook a little too vigorously and my border got overrun. Let dry.


There is no wrong way to decorate sugar cookies so experiment and have fun!


Personally, I don't think winter is complete without snow or snowballs!

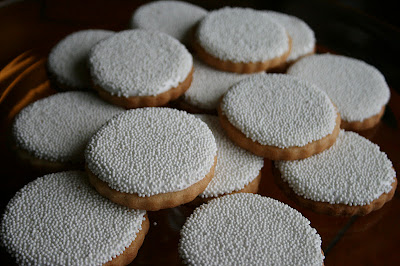
These cookies are super simple to make. {The simplest of the bunch} 


Simply cut out small circle cookies (mine had a little ruffle around the edge), flood with white icing and sprinkle with white non-pereils. I flooded all the cookies and then went back to sprinkle so the non-pereils wouldn't sink into the wet icing too much. It probably doesn't matter. Just make sure it doesn't dry before sprinkling.

To make these cute mittens (below), I flooded the top of the mitten with a color (and design if applicable) and let it dry while I did all the cookies. I then went back and flooded the bottoms with white icing and sprinkled with white non-pereils. Make sure the other part of the cookie is pretty dry so the non-pereils don't stick to something you don't want them to stick to.
 When the red icing was dry, I piped on the white snowflake and placed pearls at the ends of the snowflake and in the middle. Not too bad.


To get the design below, flood the cookie with blue icing and then draw four green lines across the cookie. Using a toothpick, drag through the icing straight up and then down, then, up and down again. Give the cookie a shake to level it out.


The wrapped candy cookies were quite an adventure for me. I could not find a cookie cutter anywhere and of course I waited too long to be able to order one on line. :) So......

...I made my own cookie cutter. It was totally fun and gave me a sense of empowerment. :) 
It actually wasn't as difficult as I thought.
I bought a "make-your-own-cookie-cutter" kit from Orson Gygis and decided to give it a go.


The kit came with the wood board with peg, a ribbon of metal and some tools (for round edges and sharp edges) needed to form the cookie cutter and an adhesive to secure the ends together. Not bad for $15. It will make about 3 cookie cutters and then you can buy refill metal ribbons for about $5. So now I can make whatever shapes I want! For cheap! No restrictions!


The result?....


Sweet! (Literally...)


This would make another good video....dang it. I need to get on that.

So...... Homemade Cookie Cutter + Cookie Dough =


I think they turned out rather swell, don't you?
For decorating, I started with the center and flooded with the solid color (always remember to create a border first!). My icing was starting to thicken and dry a little at this point (especially the green and red) so you can kind of see the lines where I dragged the toothpick. To prevent this, just add a very tiny bit of water to thin it out slightly before piping/flooding.


To get the polka dots below, simply place a small drop of white icing onto the still wet flooded icing. It will sink in and look like this.


For the wrapper ends, draw a border, flood with icing and let dry. Then go back over the border and add some pleats to the wrapper with 3 straight lines. Cute!


Some extra snowman (or snowlady) cookies for the kids to decorate.


...And the cake.
This is an 8 inch cake and has 3 layers with a sweet cream cheese in between and vanilla buttercream on the outside.
I am going to give this cake its own post so stay tuned.


So, you put it all together and whaddya got?
{Pictures curtesy of the host}


Great Job! I love it!