Monday, January 21, 2013

I have so many things to post that I don't really want to post anything. Haha.
Ever feel that way?

Wednesday, January 16, 2013

New LDS Youth Curriculum~ LOVE IT!


I just have to give a proverbial shout out to the new LDS youth curriculum: Come, Follow Me.
Can I get a "Woot! Woot!"
I am so glad this has been initiated.
For those who aren't sure what I am talking about, The Church of Jesus Christ of Latter-Day Saints holds a 3 hour church block in which the classes are split up according to different categories such as age, gender, priesthood status, etc to help guide discussion to appropriate topics. For both male and female youth, they attend each of the following for approximately 1 hour each: Sacrament Meeting, Sunday School and Young Men or Young Women.

This new curriculum focuses more on guiding youth lessons by recognizing promptings from the Holy Ghost and teaching the same way Christ taught his disciples, through a discussion like mode rather than a lecture format. Christ often asked questions to his disciples that he might understand their spiritual maturity and then answered them appropriately according to what they personally needed to hear. He often explained gospel doctrines through specific examples, also known as parables, that related to their life at that moment in time.

"But the Comforter, which is the Holy Ghost, whom the Father will send in my name, he shall teach you all things, and bring all things to your remembrance, whatsoever I have said unto you." John 14:26

Using this type of teaching style in our modern setting grants each member the tools needed to learn for themselves the truths of this gospel and gain greater intelligence. It allows each individual to convert themselves through diligent study, prayer and guidance by the Holy Ghost resulting in stronger testimonies and knowledge of Christ's church. It also has many other benefits including increased fellowship and confidence in their knowledge of the gospel , which helps nurture full-time and lifelong missionaries. Christ himself said "Feed my sheep."

I invite you to watch this quick 4 minute presentation that describes this new curriculum. I'm not going to lie, this curriculum is pretty cool and I am really excited to start using it with all the resources it provides. If you would like to watch other videos of how to do this click here.


"And he saith unto them, Follow me, and I will make you fishers of men." Matthew 4:19 

Monday, January 14, 2013

New Share the Love Project: The Road Home

Who knows about The Road Home and what their mission is?
Sometimes it's hard to know how to help if you don't know who needs the help, right?
Well I am going to introduce you to different organizations that need your help and the first one is:


A few simple words sum up why I really love The Road Home.
"Give a man a fish, you feed him for a day.
Teach a man to fish, you feed him for a lifetime."

  They don't just provide a shelter for those in need but they help them re-establish permanent housing and a better life. This is critical to truly helping those without homes get back on their feet and keeping them off the streets. Housing is one of the first things you should have and they help you get it.

I first want you to watch this video.


If that doesn't bring a tear to your eye or make you want to help out then you should watch it again or go watch some of the other videos they have HERE. They are so good and eye-opening, I would encourage you to watch all of them. I'll be posting them all eventually, one at a time.

Did you know....

The Road Home is the largest shelter in Utah.


The Road Home provides emergency shelter and housing services to men, women and families in our community.


The Road Home has helped over 1,000 families move out of shelter through Rapid Rehousing.  


It only takes $9 to shelter one person for one night.


The Road Home is locate at 210 S. Rio Grande Street in Salt Lake City, UT
They also have a Community Winter Shelter at
529 West 7300 So in Midvale, UT


In 2011, The Road Home provided shelter to a total of 7,000 people, including:
•615 Families (including 1,063 children)
•4,387 Single men
•740 Single women


During the Winter Shelter months The Road Home expands from serving an average of 635 individuals per day, to serving 780 per day. This saves lives.


They never turn anyone away.

CLICK HERE for a more comprehensive showing of the services they provide to the community.


 "So, how can I help?"

Make a Donation. I have a "Donate" button on the right side of my blog to make it easy!
CLICK HERE to see a list of items that they do and do not accept as well as delivery sites. You may also drop donations off to me at any time if you are in the Centerville, UT area.
In winter the most needed items are:
Warm clothing, blankets and shoes!
So do a little New Year clean out and see what you could donate to them!
Consider sponsoring a Palmer Court Apartment Kit to help a chronically homeless family get re-established in permanent housing. These kits include essential home items. CLICK HERE for the different kit lists.
  
Attend One of Their Events such as the following one coming up! 


Join TD Gift Solutions and 120 local boutiques & retailers for a Valentine's Gift Show to benefit The Road Home.

Clothing Drive Needs:
Hygiene Items
Towels & Pillows
Blankets (all sizes)
Baby Items (diapers, wipes, bottles, ect.)

Raffle Tickets for donations!

Pampered Chef Cooking Demonstration
Photos with Cupid
Key Note Speaker: Leta Greene
Sponsored by: Utah Olympic Oval

Volunteer! Being the largest shelter in Utah, they are a very large facility and can use your help! They have great opportunities to help ALL ages. Through giving your time you can make a huge impact on individuals or families. You can also really help if you are bilingual! CLICK HERE for more volunteer information.

Do you have a group that wants to donate time? This is a great way to provide service in a ton of fun ways such as sorting and putting together kits from donated items or making a dinner and taking it to the shelter to serve to guests. If you are a local food business owner, wouldn't this be a great way to use the food that wasn't sold?! You can even design your own project to help them. This would be great for Young Women or Young Men activities!
CLICK HERE for group information.
You can also volunteer for activities with the Palmer Court Residents. I think this one sounds like a ton of fun: Teen Night Out! You get to plan and take them on activities such as movies, bowling, sports games, you name it! Go have fun! CLICK HERE for Palmer Court Volunteering.

Here is also a very unique and awesome project that was launched Dec 4, 2012 and will be occurring on Jan 30-Feb 2, 2013.
100,000 Homes: Salt Lake City
100,000 Homes: Salt Lake City supports a national movement of change agents working together to house 100,000 vulnerable and chronically homeless individuals and families by July 2014. Homeless service providers and local volunteers will take to the streets for Registry Week. The objective is to create a by-name registry of people living on our streets, so that we can prioritize those who have been homeless the longest and are the most vulnerable, and move them into housing. What we learn together during this week will help us reduce and ultimately end chronic homelessness in our community. Volunteering for this requires a training day so you need to sign up for it. You can also sponsor or volunteer goods if you are a business.
Check out their Facebook page HERE to read more about it and sign up to volunteer.
 This would be so incredibly rewarding and such a great experience. Take advantage of these awesome opportunities! 

The Road Home collaborates with a variety of organizations to ensure families and individuals have the tools they need to get back on their feet and stay there. Check out all the resources in this link. Community Resources

 I can personally say that I have learned a ton and have grown to love The Road Home as I investigated and created this next Share the Love Project. When I am able, I would like to coordinate volunteer activities to do, so when I do (or if I hear any of you are!) I will pass along the information!


Ya know, sometimes people just a need a little bit of help to get back up on their feet and be fine again. With your help, they can. Join me.

Share the Love


Friday, January 11, 2013

Homemade Hot Cocoa


I wasn't going to post today but I felt compelled to do so because of the weather outside here in sunny Centerville, Utah. 

 It's beautiful! All 18 inches of it!

I love huge snow storms (as long as I don't have to drive or the roads are clear).
 
So anyway, I had a really bad headache this morning and decided that Hot Cocoa would definitely make it go away. Funny thing.... it did. :)


Here is a fabulous and super quick hot cocoa recipe for those days when you find yourself lacking pre-made hot cocoa powder or just like to make things from scratch. There are lots of good hot cocoa mixes out there (Stephen's Dulce de Leche Hot Cocoa...drool), just make sure you use milk! That's what makes it creamy and rich, plus it gives you some nutrients too.
If you do make the hot cocoa from scratch it is a bunch cheaper.
Plus you can adjust it until it is your perfect flavor!
You like it sweet? No problem! Add a little more sugar.
You a chocoholic? Right on! Add more cocoa powder!
You can add hazelnut, caramel/ dulce de leche, peppermint sticks, you name it! You can have it your way!


So snuggle up in front of your fire with a warm blanket and a good book and sip away at your rich creamy hot cocoa. Enjoy the moment. Mmmm..... :)


Dang it. My headache is back. Better go make some more hot cocoa...
Homemade Hot Cocoa
Ingredients:
1 1/2 Tbsp sugar (or adjusted to your preferred taste)
1 Tbsp cocoa powder (or more!- I used Ghirardelli sweet ground chocolate and cocoa)
2 Tbsp water
1 cup milk
¼ tsp pure vanilla extract (or other flavoring)

Combine sugar, cocoa and water in a small saucepan and heat over medium until sugar is dissolved.  Stir regularly to prevent scorching. Add the milk and flavoring and whisk well until it reaches your desired temperature. Make sure not to get it too hot before serving so it doesn’t risk burning someone, especially children. If you need to keep it on the stove, just turn the heat down to the lowest setting to keep warm. I love hazelnut or caramel/dulce de leche flavored hot cocoas so adding a bit of that flavoring is next on my list! I'll add an addendum if I find other awesome additives! Apparently, doubling the cocoa powder is a fabulous idea! ;)


Thursday, January 10, 2013

Perfect Fresh Strawberry Ice Cream

I don't know what it is about winter, but it always makes me crave ice cream despite how cold it is outside. Maybe it's the heavy cream that tempts my senses into thinking it will eventually make me warmer.... at least around the hips. ;) That's my theory.
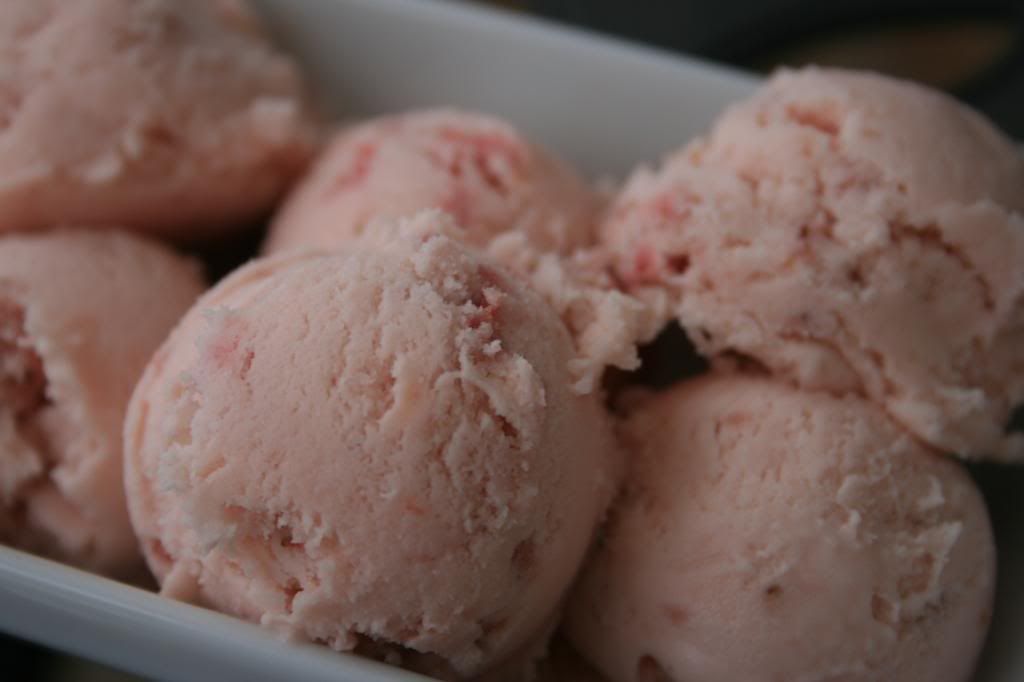
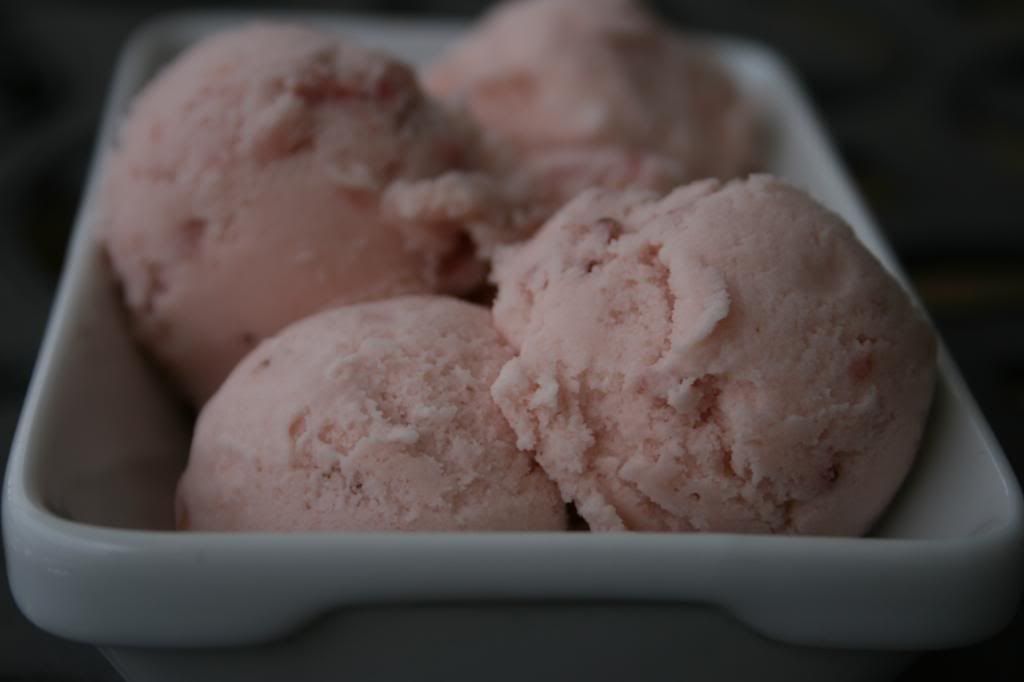
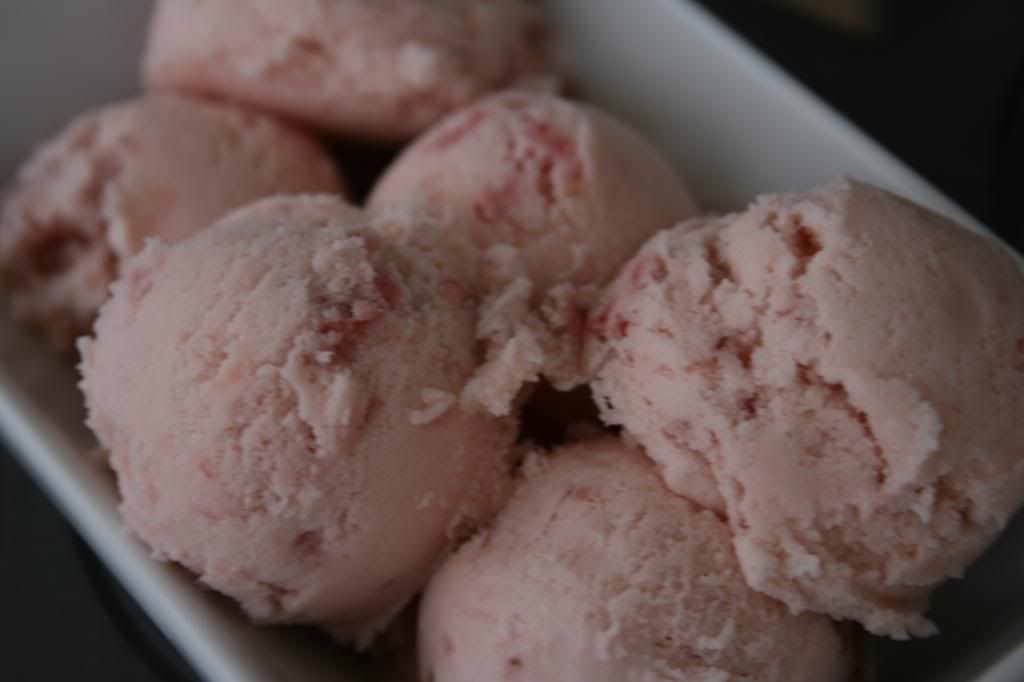
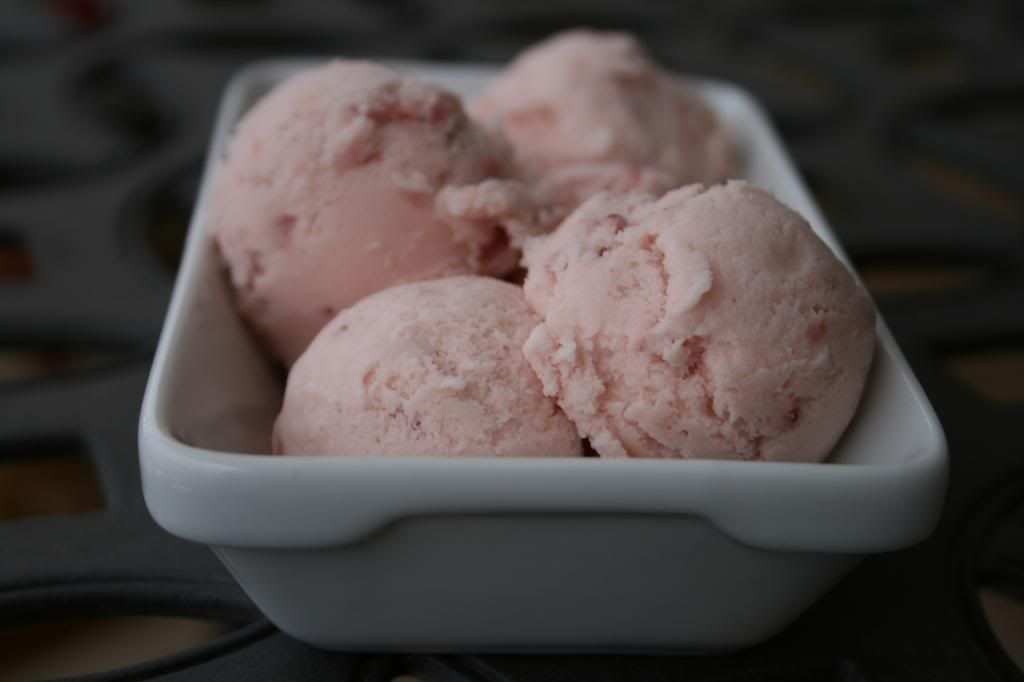
Anyway, I have the perfect recipe for fresh strawberry ice cream. It is amazingly creamy strawberrily delicious. Yep. I'm excited. =D
I love me a good strawberry ice cream.
Plus I found out it gets better as it ages in the freezer. Mmmmm.....


Today I made some fresh pasta for my niece's birthday and was thinking (as I was licking an empty spoon) that I should have made her ice cream! What kid wants fresh pasta over ice cream?! Silly Aunt Sara. ;)


The key to amazing strawberry ice cream is amazing strawberries. I've said this before and I'll say it again. You can't expect to get amazing strawberry flavor in your dessert from dull or tart strawberries. It denies all laws of food physics. Just don't try it. Get good sweet delicious strawberries.
Oh, and if you are needing to clean out your automatic ice maker in your freezer, this is surely the way to do it. I used exactly one full binful of ice. Perfect!


I am trying to say lots of interesting things because I got so many yummy pictures...


Yup.

Mmhmm.


Ok. On with it already!

Perfect Strawberry Ice Cream

Serves 6...or just 1
Ingredients
1 pound fresh sweet strawberries, hulled and chopped into pretty small chunks
1 tablespoon fresh lemon juice
2 large eggs
1 cup sugar
2 cups heavy whipping cream
1 cup milk (I used 2%)
1 teaspoon vanilla extract
1 big pinch salt

Directions
Combine chopped strawberries, lemon juice, and 1/4 cup sugar in a mixing bowl, set aside in fridge for a couple hours (I did 2.5 hrs). In a large bowl, beat eggs for 2 minutes or until light and fluffy. Sprinkle in 3/4 cups sugar and mix well. Stir in the milk, vanilla and salt and mix well. Mash the strawberries pretty good so you don't have large chunks (keep the juice). You want pretty small chunks so they don't freeze and break your teeth. Add to the other mixture and mix well. Stir in whipping cream and refrigerate until chilled or overnight (I waited almost 24 hrs). I like to give it more time for the flavors to meld. I could definitely taste a difference after it had sat in the fridge overnight. Pour into ice cream maker and follow manufacturer's instructions. I have a good old fashioned (motor driven) ice cream maker and it churned for about 30 minutes. Then I took out the dasher and scraped it off, packed the ice cream down into the can, corked the lid and replaced it. I covered it with more ice and a little more salt (I used our water softener salt... it worked) and let it sit for about 3-4 hours to harden it. Dish out and enjoy quickly or store in freezer. (It melts fast) You'll want to eat it within about 5 days so it will be creamy and not crystalized. Enjoy!
{Original recipe I found on Food.com but I tweaked it a bit}


Saturday, January 5, 2013

Peanut Butter Bars


There are certain things in this life that are just meant to be together.

Salt and Pepper
Jack and Jill
Yin and Yang
Macaroni and Cheese

Well, in the world of sweets you can bet your knickers that one of those pairings is
Peanut Butter and Chocolate
 Mmmm....
Who doesn't just love the combination of creamy peanut butter and rich chocolate?
{All of you who overdosed on Reese's cups and now can't stand to eat them don't count...}

Point being, it's pretty good and my husband, Ben, loves the peanut butter/chocolate duo. He requested I make some peanut butter bars... "the kind with oatmeal in the bottom".
And so it began.
I whipped out a ward cookbook and knew there was going to be a gem in there. Peanut butter bars are one of those desserts you can expect most people in your neighborhood to be able to make. Everyone has a different recipe and they are somehow all amazing.

Here they be in all their glory.


These are fabulous with their fudgy texture.
I just love ward cookbooks. ;)

Testimonial:
"Fact: I don't like peanut butter. Second fact: I would give my first born for these bars. Delicious!"  ~Jillian Rose
Well there you have it ladies and gentlemen. Need I say more?


This recipe is also very easy to make. Guaranteed success.
It is great because it makes a lot at one time so it would be perfect for gifts, parties, vacations, etc.


These bars are sweet so if you (like me) prefer desserts that are less sweet and more rich or "deep", for lack of a better term, then this may not be the recipe you are looking for but it is sure to be a crowd pleaser!

Peanut Butter Bars

Ingredients for cakey-doughy part
3/4 cup Creamy Peanut Butter
3/4 cup Brown Sugar
3/4 cup White Sugar
2 eggs
3/4 cup Salted Butter, softened
1 tsp Vanilla
1/2 tsp Salt
3/4 tsp Baking Soda
1 1/2 cups Flour
1 1/2 cups Oatmeal

Preheat oven to 350 degrees. Line a jelly roll pan (standard half sheet baking pan with sides ~ 10x16") with a sheet of parchment paper. You can use a smaller pan for thicker bars if desired. Beat together peanut butter, brown sugar, white sugar, eggs and butter. Add vanilla, salt, baking soda, flour and oatmeal.  Press mixture into bottom of pan to spread (mine did not reach to all the edges). Cook for 10-12 minutes (I cooked for 10 min). They will look undercooked when you remove them so don't overcook them. Let them cool and top with more peanut butter (optional- I did not do this but probably will next time) and the chocolate frosting.

Meanwhile, back at the ranch.
Ingredients for Chocolate Frosting
1 cup Sugar
1/4 cup Chocolate (I used semisweet chocolate chips)
1/4 cup Salted Butter
1/2 cup Milk
2 Tbsp Light Corn Syrup
1 1/2 cups powdered sugar (or until desired consistency, decrease for less sweetness)
1 tsp Vanilla

Bring all ingredients except powdered sugar and vanilla to a boil over medium-high heat. Boil for 3 minutes, stirring. Place bottom of pan in cold water until mixture cools and thickens a bit. Add powdered sugar and vanilla and mix until thoroughly blended. Pour on bars before mixture hardens.
{Recipe from Brooke Johnson in Parish Canyon Ward 2012 Cookbook- Thanks Brooke!}


 Enjoy!

Wednesday, January 2, 2013

Awesome Bible App

I just discovered an awesome app for Bible videos and stories about the life of Jesus Christ. 
It is found HERE. {You can also watch them online.}
You can read through the birth and early years of Christ and watch videos that are linked near the text. You can continue on with his life and ministry by watching the videos. I love these kinds of videos. They can give you an increased insight of what it really might have been like. These videos are really high quality too. They are the same style as the one I posted on Christmas.
This app is a perfect way to pass the time while you are waiting for an appointment or just because.
I sure love them. You will too!

Here is an example!
Enjoy.