Friday, November 9, 2012

Lollipop Birthday Party


I LOVE themed parties because it turns a good party into a memorable party.
This party was no exception! 
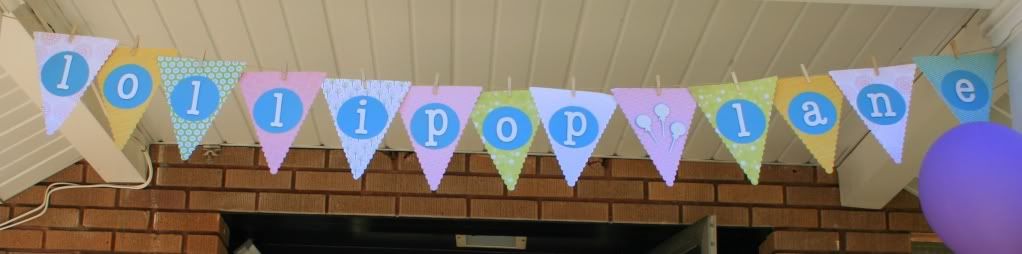


You only turn ONE once so why not start off those birthday parties with a POP!
 That's what my friend, Marci, thought too.
Nothing says "You're 1!" like a Lollipop Party!
  She did such an awesome job of organizing and creating an amazing party for her cute carrot-topped one year old, Lily.

I love her cute little personalized tutu outfit.

 
Join me for a walk down Lollipop Lane!
The theme colors were pretty pastels. As you will see, color is one thing this party did not lack!
 The entrance started the party off fabulously. I love festive entrances because it just tells you to get your party pants on 'cause we're not joking!

 
Marci made these pennants herself out of paper from a scrapbooking store. Made with love.


... and matching balloons. Can you really have a party without them?!


One of my favorite things about this party is that Marci used old fashioned candies to create a candy bar. Not a real candy bar but a candy candy bar... you know what I mean. I LOVE the concept of old fashioned candy and if I could make a living owning an old-fashioned candy store with the cute glass candy jars and little scoops and scales... I'm pretty sure I would pick up and do it right now. 
Yes, I like candy. How could you tell?


First Stop
Lemon Drops and Cake Pops


Made from a lemon pound cake, these cake pops have the perfect texture and flavor combo.
The lemon flavor is pure and fresh and perfectly balanced between the cake and buttercream frosting.
To tip onlookers of the delicious lemony surprise inside, I showcased the pastel vanilla candy coating with yellow jimmies in a whimsical swirl. Place some lemon drops in a jar with a cute little tag and insert that inside a ribbon lined foam ring filled with these little lemony daisies and you got yourself a lemon party. Sweet Huh?!


Next up is a picture of the cute little cake. I absolutely love these little 4 inch cakes because they are the perfect size for a personal cake, especially for one that a 1 year old is about to destroy!


This cake was covered in fondant and trimmed with a few different colored ribbons. To attach the fondant circles, just dip your finger into a little bit of water and spread it on the back of the fondant circle. This makes it tacky so it will now stick to the other fondant.You are ready to create a masterpiece.


Marci supplied me with this super cute lollipop candle that finished the cake off perfectly.


Vanilla dipped rice krispie treats are always a great addition to a dessert bar.


A huge hit with the kids was the automatic bubble blower. It blows 1,000 bubbles per minute! I need this for my dog!


I LOVE, LOVE, LOVE these pink and white lanterns. I'm trying to figure out how I can incorporate these around my house somehow. Come on, now every day's a party!


Another super cute idea was using clothes pins to clip pictures onto a clothes line for all to admire. These pictures were filled with a whole year of memories!
{Beware the wind...wind is not your friend with this} 
You could also do this concept with the wire zig-zagged down an antique shutter so it has some stability on one side.


These were one of the hottest items on the dessert table.
Mexican Chocolate Cake Pops in the shape of a "1".
Oh my goodness. These. are. tasty.
They were gone fast. We should have made more.
Mexican Chocolate Cake Recipe can be found HERE.


The other pops are chocolate dipped oreos. Mmmhmmm. I did.
Also so tasty.
Let me warn you that these should not be placed in direct sunlight. Yes, they will melt.
But only if they don't get eaten first....so you may be ok.


These little mini lollipops were the perfect size! It was so cute seeing tots walk around with a mini-me sized lollipop. Just one of those cute little details that totally makes the party.


And who doesn't love a good old fashioned sugar stick. Mmm... strawberry.
I love granulated sugar for suspending lollipops, candies and cake pops. It's recyclable {not for baking....that's gross. You can reuse it for another party though!} and cheap plus it works quite well and was perfect for a sugar-filled lollipop party! Why not?


This is one of my all-time favorite candies. The perfect amount of sour mixed with cherry flavor and sweet goodness. Mmm... mmm... good.  And really addicting. Be warned. The cherry sour.


And then comes the chocolate. Need I say more to you chocolate lovers out there?


I remember going to the penny candy store with my mom for movie nights and ALWAYS buying these little guys for about 5 cents. I miss the good ol' days of penny candies but I love the fact that they still make the candies I love from my childhood. Warm fuzzies. :)


I also remember how I would eat so many that my tongue would get raw. Oh, the sacrifices I was willing to make.


So these jelly belly candies aren't just your typical jelly belly candies. They are Snapple flavored people. SNAPPLE FLAVORS! Oh. my. goodness. I had a jelly belly bezoar in my stomach after this. 
You have to order them online but I am telling you that you should. Do it and try it and tell me how much you love them. You will never see me go nuts over chocolate like I do pure sugar. Gaahhhhh... drool.


Remember candy buttons {which until recently I thought were called "dots"} ?


They are pretty disgusting (I think they taste like food coloring) but they have such character and history that I can't help but love them. I remember loving these as a kid. What? It's pure sugar. Nothing wrong with that as a child.


We featured these cute-as-a-button candies {baha.... get it?} inside the circle of lollipop cookies. These here cookies received the approval of Marci's sister, who says she is quite a connoisseur of sugar cookies. I'll take it. :)


These are quite simple to decorate actually. You give the whole cookie a base coat of colored royal icing and allow to dry very slightly and then swirl in a second color of your choosing. Voila.
Be careful not to use too much icing on your base coat or it will overflow when you swirl in your second color. Just do a little less than you think you need.
Recipes of cookie dough and royal icing may be found HERE.


One of the funnest parts about themed parties is planning the little details. I remember sitting with Marci looking at millions of little baggy designs trying to decide which one would be the perfect compliment to a lollipop party. :)
These baggies were for kids of all ages to collect their candies in. These looked like little lollipop circles and had the same pastel color theme.


Marci's husband's favorite old fashioned candies are root beer barrels so those were a must since this party was really for him. ;)


In addition to the huge dessert table was a whole second table filled with food! Oh la la!
A party fit for a king...or queen!


I just love fruit. It's tasty. It's healthy. It's sweet and hydrating. A good alternative to those who don't want to stuff their faces in the candy bar.


Sandwiches, veggies, and chips. oh my!


I love large beverage jars for some reason. I don't own any... but I probably will soon. They just make me happy.


And here is the infamous Marci digging into the lemon cake pops before the party even began!


and that's me.


Here is Marci's husband, Jeremy, displaying their HOMEMADE Pinata!
I was so impressed. I'm pretty sure it took her hundreds of hours to make this. Maybe not that long but look at this thing! It's HUGE!
Marci goes big or goes home!


If you weren't sure, the birthday girl's name is Lily.  :)
I so love the detail in this pinata. Notice how they used 2 different tissue paper techniques. Fancy!
I think I will have to have her do a guest tutorial for us all. So awesome. What a talented lady.


Marci and Jeremy before the games began.


I still think it is hilarious that we choose one of the most dangerous games possible for children's birthday parties. Haha. I would give anything to have been a part of that first conversation inventing the pinata. 
"Yeah... and then after we fill the box with candy, we should hang it from a tree and put blind folds on the kids so they can't see anything and give them a large heavy bat to swing at it with!" 
But seriously, you really can't beat how much fun a pinata is at your birthday party.... even if you are only 1. I am sure Lily thought it was the best part of the party.


Here is a picture of the back of the pinata... notice something?
Yup. It's a GINORMOUS LOLLIPOP!


Luckily there were no casualties. Some near-misses, but no casualties. I call that a win.


And the moment we have all been waiting for!
Look how cute she is!


She had no problem digging right in (once mom helped puncture the fondant barricade).
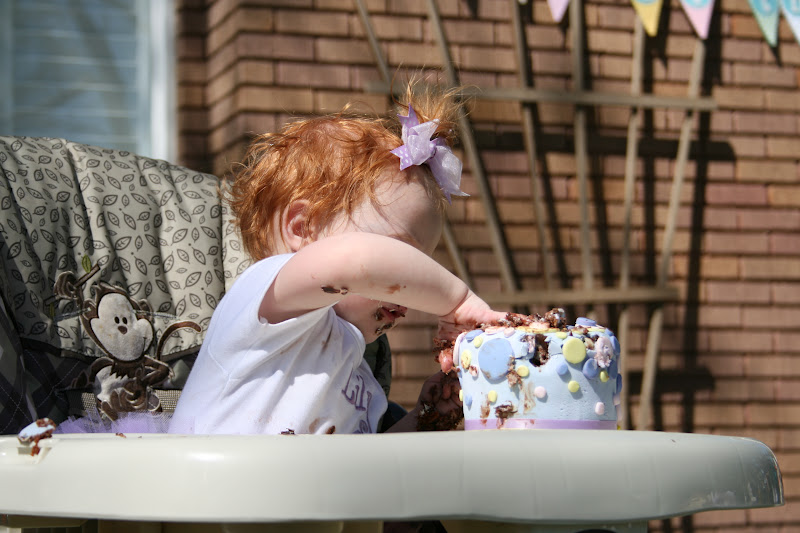


Sweet goatee!


and some cake in the eye, why not?


Besides being all over the table and Lily, most of the cake was actually eaten by a certain sneaky aunt. ;)


My personal favorite pic is of her eating the cardboard.... the cake was THAT good!
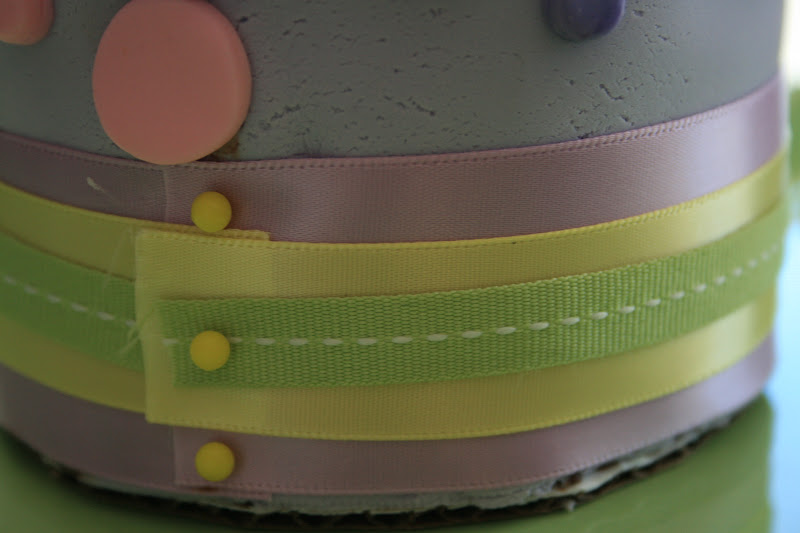
So I just wanted to show you how I secured the ribbon to the cake. It all depends on the type of ribbon you have. I had a really silky ribbon so I couldn't glue it to the fondant with some icing. You can get some sort of fasteners that look like pearls made for wedding cakes but I didn't have time to go get any so I actually used some long sewing pins (wash them first if you do this). We just took them out when it was time for Lily to dig in.


Awwwww.......


The End


Saturday, October 13, 2012

Chocolate Ganache Cake with Raspberry Filling... and Some Strawberries on Top.

This here is a rich chocolate cake with raspberry filling covered in a dark chocolate whipped ganache and topped with fresh strawberries.


My friend, Marci, wanted me to replicate her wedding cake for her anniversary. She and her husband never got to eat their wedding cake due to a fun family tradition.... actually it's probably closer to a bitter family rivalry. ;D
He continues to speak of it to this day so she decided it was finally time to give him a taste of his own wedding cake.
So I did my best.

Here she be.

It looked so tasty...
These pictures don't do it justice.
I impressed myself.
I was tempted to sneak a piece. I doubt they would have noticed.

This cake was simple to make. Make your chocolate cake in 8 or 9 inch round pans. Tort your 2 layers so that you now have 4 layers. Place a layer on your cake board (using a bit of ganache to glue it down) and pipe a chocolate ganache dam around the whole edge. I whipped my ganache after cooling it down in the refrigerator to make it more of a buttercream frosting consistency but you can leave the ganache smooth and silky too (it makes the dam a bit more difficult though). For the raspberry filling, you can make your own or you can use a store bought jam of your favorite kind. I was going to attempt a home made raspberry filling (never done it before) but just ran out of time so I used Smuckers Simply Fruit Red Raspberry. It's the only kind of jam my husband will eat so I figure it must be pretty good. Spread the amount of raspberry filling you would like inside the dam. This amount is a personal decision. Add what feels right and not a bit more. :)
Place another layer on top and repeat until you have placed your last layer on top. Cover the whole cake in the ganache. While the ganache is still wet, place your curls on the cake (see below how to make the curls). If your ganache is dried already, no problem, just dab a little fresh ganache on the curl before sticking it to the cake. Use a skewer to transfer the chocolate curls around instead of touching them directly. The heat from your fingers will melt the chocolate and make a gooey mess.


See those cute little chocolate curls? They were almost the death of me. Either I am just not at all skilled in this area or these are actually really hard to make. These aren't even the chocolate curls I was going for! I wanted some big curls and this is the best I could muster.
{At least they were pretty cute too}
Here is what I did to get these curls. {I will work on getting the bigger curls another day}.
You take 3 oz of semi-sweet chocolate chips and add a tablespoon of shortening. Microwave just enough to melt the chips. Stir until smooth. Spread the melt onto the back of a flat cookie sheet and, using an offset spatula, spread as thin as possible. {You can spread an entire side of a cookie sheet with the 3 oz.}
Allow the chocolate to harden a bit. Depending on the temperature of your kitchen, you may need to put it in the fridge (I did). Once the chocolate is kind of dry to the touch but not super hard, try scraping off a curl using a flat utensil. I used a brownie cutter/server and it seemed to be a good size.
Press down hard and push forward while providing continuous pressure. If it curls... awesome! Stop when you have the size of curl you want. If it breaks in small pieces then your chocolate is too hard and needs to warm up a tiny bit. You can do this on the counter if it is warm or in a low temp oven. If it scrapes off but isn't curling, it is too soft. Cool it down a bit somehow (fridge for me).
Be careful, these curls are fragile. As you make your curls you may want to keep them refrigerated so they don't melt. Use toothpicks/skewers to move them around.
I struggled a bit with just getting these so I will be looking into this and practicing different methods in the future. I definitely hope there is a better one out there.


Last step:
Pile some strawberries on top. Voila!
Magnifico!
It turned out pretty dang irresistible looking and the recipients gave their approval.
This would also make an absolutely fabulous Valentine's treat.... how romaaantic. Awww... <3

Chocolate Cake and Ganache Recipe HERE

Monday, September 24, 2012

Ummm.....this post is really about real food....really {Sausage Rolls}


...but it involves puff pastry so I am ok to post it.

So, this is one of those things that you hate to admit like loving the spice girls or being afraid of the dark in a real but illogical way. (...if you are really afraid that something is going to grab or eat your foot while it is dangling off the bed..... why are you in the room?!)
But I digress.
I hate to admit it but I love sausage rolls. 
It's kind of gross and I know it, but I can't help it.
I may not have told you but in my youth I actually worked at a French Pastry Bakery (...that happened to be owned by Scottish people) and not in a cool, "I used to make pastries and desserts and now I have skills" kind of way. More of the, "I used to sell and eat desserts and now I have love handles" kind of way. 
Actually, I didn't eat the desserts. I ate the sausage rolls. Back to my point.
Sausage Rolls.


We are just going to breeze on by the fact that I have no idea what is in my sausage and focus on that delicious flaky golden puffy goodness surrounding delectably sweet maple sausage.
Gahhhhh....... 
Makes me drool a little bit.
Think this is a treat you have to save for that special occasion and purchase fresh in the morning from the bakery at least 15 minutes away? 
No sireee!
You too can have delicious flaky goodness at home!
And it is a thousand times easier than I ever thought it could be.
Sometimes I forget about the modern miracle known as the freezer and the fact that I can purchase certain ingredients for my creations made possible by the concept of "semi-homemade".
Thanks Sandra.
Some things MUST be made from scratch but for this application, frozen is perfectly fine!
I am practical and it makes life great!
{But please don't buy frozen french macarons. don't.}
You sure could make this all gourmet and from scratch by-the-by! 
More power to ya, honey, if you are gourmetizing a sausage roll!

Let us continue.
There really isn't much to it at all.

DISCLAIMER: Ugly picture immediately below. 
If you are pregnant or vegetarian/vegan, avert your eyes now and scroll down about 10 clicks of the down arrow.

Unroll your frozen pastry and cut along folds to make 6 of these long strips.
Make 6 sausage loaves and place in the middle of your pastry. 
{I actually used 2 sausage links as shown below but would not use links next time if possible because a non-link sausage loaf would fill the pastry space much better I think. Maple only came in links at my store so I just tried the links (cuz there no way you gonna make me give up my maple. nuh, uh.). It turned out completely delicious but it just looked kind of funny inside and was a little difficult to eat. It worked but was just not optimal. If you do go the link route, use 3 links to fill the space because there is a lot of poofy pastry!}


 Use egg wash to seal the edges as you fold the top and bottom together and pinch, then fold the sides together and pinch. Like so.


Brush egg wash over the whole roll.
Pop in oven at 400 degrees for 15 minutes and out pops a beautiful golden poofy poof. 
Like so.


Really?! 
That's it!?
Yes, my friend. I mean, No, my friend.
WAIT FOR IT TO COOL DOWN!
Or else the sausagey magma will burn your face right off and you will be cursing my name.
Don't say I didn't warn you.
Now enjoy.


Just look at how gorgeous and perfect that golden crust is! Egg wash magic!

Anyway, I am blaming my love of sausage rolls on the Scottish blood in me.
{Shout out to all the Birrells, O'Carrolls and Campbells!}

Hey! Want to know something SUPER cool?! These sausage rolls will freeze well (unbaked)! This makes a great make-ahead meal!
Sausage Rolls
Yields: 6 sausage rolls (1 serving each)

Ingredients:
Pepperidge Farm Puff Pastry Frozen- 2 sheets (located by the frozen pie stuff)
Maple Sausage (or your favorite flavor)
1 egg, beaten

Preheat oven to 400 degrees. Unfold puff pastry and cut along folds to make 6 pieces. Allow your puff pastry to thaw enough to be foldable and not breakable. Form your sausage into 6 mini loaves and place 1in the middle of each pastry strip. 
{I actually used 2 sausage links but would not use links next time if possible because a non-link sausage loaf would fill the pastry space better. Maple only came in links at my store so I just tried links and it turned out completely delicious but it just looked kind of funny inside and was a little difficult to eat. It worked but was just not optimal. If you do go the link route, use 3 links to fill the space because there is a lot of poofy pastry!}
Fold the top and bottom edge over the links and seal with some egg wash (i just used my finger to spread it on). Squeeze the ends together real good. Now seal with egg and pinch the sides together. Brush egg on top of the whole sausage roll. Place on an ungreased cookie sheet.
Bake at 400 degrees for about 15 minutes. Watch your pastry after about 10 minutes to make sure it doesn't burn. It will be done when it looks puffy and golden. Yes, the sausage is cooked inside (maybe it wouldn't be if you put A TON of sausage in). I wasn't sure if the sausage would be done at the same time as the puff pastry but it was perfect! Remove from sheet with a spatula.
PLEASE allow to cool or else the  juicy sausage will burn your face off. I warned you.
That's it! Now go share it.

Sunday, September 23, 2012

Felicia's Sweet Crepes

Crepes are one of those amazingly delicious comfort foods that you really could eat any day of the week. For me it all started as far back as I can remember.


Crepes were our family's Christmas comfort food. Add in some maple sausage, bacon and hot chocolate and you got yourself a feast for the finest on such a special day. Combined with the magical feeling of family and Christmas, nothing gets better. Really. :)


 As of late, my grandma (Felicia as my grandpa would call her) has passed on the responsibilities to me to make the Christmas crepes for the family. You have to have the right recipe, the right pan and the right utensils plus you have to store them in the right way so they stay warm.
She taught me well.
And now I will share this with you.


I have tested other crepe recipes and settled on the fact that my grandma's are still my favorite. Maybe it's because they are the ones I grew up with. Or maybe they really are the best. Either way....they are fabulous and surely worth your time.


So here it is:
1- You need a flat griddle. I just bought a new one to claim as 'my crepe griddle'.
I bought the Nordic Ware Reversible Round Griddle (at Target for about $30) and I absolutely love it. It flips over and you can use it as a grill on your stove top because it has deep grill grooves on the opposite side of the flat griddle. Multi-taskers are the best plus it's non-stick. L-L-Love.
{You should see my grandma's. It looks like it is over a hundred years old and crossed the plains with our ancestors. Maybe it did. I claimed it as a part of my inheritance.}
2- You also need a ladle. If you want to use one of those fancy crepe trowels then go for it but it is not necessary.


The process:
You blend your ingredients in a blender. Check.
Put batter into a bowl. Check.
Use ladle to pour batter onto a hot griddle (my griddle was nonstick so I didn't even have to spray it or anything!). Check.
Use bottom of ladle to swirl the batter into a thin round crepe. Check.
Pour yourself a glass of OJ. Tick. Tock. Tick. Tock. (about 30 seconds)
Release edge of entire crepe using a hard plastic spatula and flip.
Tick. Tock. (about 10 seconds)
Taste test for quality assurance purposes.
Repeat above steps.
Flip onto plate and roll crepe. Check.
Store in casserole dish to keep warm.
Share.
Decorate. 
Eat.
 Enjoy.
BAM!

Thaaaaat's about it.
Yeah, I thought there were more secrets too...
The secret must be love. Awwwwww.
Crepes are actually really easy to make (no secrets about that). So give 'er a try.

And seriously, these crepes are so tasty just by themselves that you won't be able to help but perform a little quality control frequently as you are making them.


Crepes are also so fun because they are French! And who doesn't like to enjoy a little Frenchiness in their life every once in a while. I personally love France. My high school report card says I should speak French but that was a long time ago so now I will hang onto my love of French things by diving into the culture, making French foods and saying "Mais oui" for the fun of it. 
Lately I have been trying my hand at some French foods and desserts {that I will be posting about shortly} and it has been a really fun change to the normal cake pops, cookies, brownies and cakes. I am loving it! So much that maybe, just maybe, I'll have to dust off that old French book of mine and brush up on it just because I can.


Crepes are sweet and tender but most of all, they are part of a wonderful tradition that brings back warm memories. I named these crepes "Felicia's Sweet Crepes" because my grandma's name 'Felicia' comes from the Latin word for 'happy things' and these crepes have definitely created many happy memories.
Start some traditions and share some memories with your family using this recipe.

Felicia’s Sweet Crepes

6 eggs
2 cups milk
1 ½ cups flour
¼ cup sugar
¼ tsp salt
½ tsp vanilla

Combine all ingredients in a bowl and beat until smooth.
Heat a round griddle until hot- stove tops will vary but mine is usually set right below medium.
Brush with butter if not using a non-stick griddle.
Dip ladle into batter and pour into the middle of the griddle. :) Adjust amount as necessary.
Quickly swirl mixture with bottom of ladle and spread batter into a very thin round crepe. If you accidentally created some bare spots while swirling just fill them with a small amount of batter.
Watch carefully lifting edge of crepe to see if it has browned to a light brown color.
Slide spatula under edge of entire crepe to release edge and then slide to the center. Flip crepe. Let this side brown for another 10 seconds or so until just starting to get brown spots. This side will not brown like the top.
When done, remove crepe to dinner plate and roll up (or wedge) and put in a covered casserole to keep warm. Place towel on top to keep heat in. Serve with anything. My personal favorite is powdered sugar.
Suggestions: powdered sugar, fruit, nutella, maple syrup, breakfast meats and/or eggs, sandwich fixings, brown sugar and butter, etc. The options are endless. May be eaten as a sweet dessert or as a savory snack.

If you are looking for a more savory taste to your crepes, I found this next recipe was good as well.

Savory Crepes
Yields: 8 crepes             

Ingredients:
2 eggs
1 cup milk
2/3 cup all-purpose flour
1 pinch salt
1 1/2 teaspoons vegetable oil

In a blender combine eggs, milk, flour, salt and oil. Process until smooth. Cover and refrigerate 1 hour. Heat a skillet over medium-high heat and brush with oil. Pour 1/4 cup of crepe batter into pan, tilting to completely coat the surface of the pan. Cook 2 to 5 minutes, turning once, until golden. Repeat with remaining batter.

Saturday, September 22, 2012

The Queen's Diamond Jubilee Union Jack {British Flag} Sugar Cookies


The Queen's Diamond Jubilee
A celebration surely to remember.
Since this is the year of the Queen's Diamond Jubilee across the world in England, a 60th birthday falling in the same year would naturally have to be a jubilee of its own.
I made these fun Union Jack cookies for my Aunt Peggy's 60th Birthday High Tea Jubilee and it surely was a labor of love.

Every time I make decorated sugar cookies, I forget how freakin' long it takes! Sheesh!
I am no wiz at decorating cookies (and as you can see I could definitely use some more practice with straight lines) so it probably takes me a lot longer than others.
So I guess this is just a warning, These cookies turn out really fun and festive and really aren't that hard but make sure you have time! I do it over a couple days actually to split it up a bit. It works. :)


To make these cookies:
I actually just made my own cookie cutter since it was just a rectangle. I love the little Make-Your-Own-Cookie-Cutter Kit I got last year. I have the exact one shown below. It really is awesome for saving time and money. Plus it really is a lot easier than you think.

Click Picture for more info.
After I made the cookies (recipes below) and allowed them to cool, I stacked them in between layers of parchment paper in an airtight container until I was ready to decorate them. 

The next day I made the royal icing. I thinned it out to a medium consistency and separated into 3 bowls. Using water-based coloring gel, tint the icing to the desired color. I used 1 and a half bottles of no-taste red gel to get it red and not pink. I didn't have to use as much blue.
Put them in squeeze bottles and go to town.
I drew in the red, then white, then blue. I did the red on a bunch of cookies so they could start to dry a bit and then went back and did the blue, etc. The trick is getting straight lines and not bleeding. I thinned my icing a little too thin and it caused me some issues but it was a little later than I would have liked so I went with it. They turned out pretty cute all the same. Don't ya think?!
Since these cookies were party favors, I put them in an individual bag and tied it with a silver ribbon representing the diamond. Fer cute!
Cheers then.


Rolled Sugar Cookies
Yields: 2-3 dozen 3 inch cookies depending on thickness
Ingredients:
26.5 oz (6 cups) flour
3 tsp baking powder
2 cups unsalted butter
2 cups sugar
2 eggs
2 tsp pure vanilla extract
1 tsp salt
Directions:
Mix together the flour, baking powder and salt. Set aside. Cream the butter and sugar in a stand mixer. Add in the vanilla and eggs one at a time mixing thoroughly. Gradually mix in the dry ingredients. This is a pretty hefty dose of dough for a mixer so make sure yours is up to the task. I'm not buying you a new one. Mix until the dough comes together or your mixer starts to smoke. (I'm just kidding...it's not that bad.)
You can choose either of the next steps. They will both work fine.
Method #1: Place your dough in plastic wrap and flatten into a rectangle. Chill your dough until thoroughly cold (more than 3 hours but preferably overnight. Roll out and cut cookies with cutters.
Method #2: Preheat oven to 350 degrees. Roll dough out onto a floured/sugared surface until desired thickness. (1/4-1/2 inch thick) These cookies will basically stay the same thickness you roll them. Cut the dough with cookie cutters and using a thin metal spatula, transfer the shapes onto an ungreased cookie sheet placing about 1 inch apart. There is no need for parchment paper or pam or anything and in all actuality I have found that these methods cause the cookies to spread more....makes sense. Place your cookie sheet in the fridge and continue onto filling the next cookie sheet. By the time you reroll and place the cookies on the next cookie sheet, your first batch of dough will be chilled enough to slide into the oven!
*I actually use a combination of the methods above: I put the dough in the fridge until just slightly firm (less than an hour...probably while I clean up my mess) and that makes it a bit easier to roll out and not stick as much. Then I proceed with method 2. *
Note: You want sugar cookie dough chilled thoroughly before going into the oven so it will hold its shape. If the dough is not cold, the butter will melt too quickly and cause the cookie to melt and spread before the structure of the cookie is set up. Chilling does a great job of preventing this.
Bake at 350 degrees for approximately 10 minutes for a 3-4 inch cookie or until the cookie looks dry on top. Your cookies should not brown. They will stay a beautiful pale color if you cook them correctly. If your cookies start to brown, take them out! If they are brown....you've gone to far. If they are darker than brown, then you have probably already smelled the smoke. I cook 1 sheet at a time because I use method number 2 above and it just works out wonderfully but you can cook 2 sheets at a time if needed.

Royal Icing
By Sweet Dani B
Yields: 5 cups
1/2 cup meringue powder
1 cup cold water
2 lb powdered sugar
Food coloring (water-based)
Make sure you have a very clean glass or metal bowl to make your icing in. Using a strong handmixer and the beater attatchment, beat together the meringue powder and the water until you see good trails where the beater has been. Using a beater attachment instead of a whisk will decrease the amount of bubbles you create by a lot! Slowly beat in sugar until well blended and you see trails again. This icing will be pretty stiff. At this point you can separate any amount that you would like to keep for a stiffer icing for piping borders and such. {I did not do this and probably should have this time}
Thin the rest of your icing with a small amount of water until it is the right consistency.
Note: The key to royal icing is to get it to the right consistency so that it will smooth out on the cookie but not spill all over the sides. To test your mixture, make some trails from the mixer and then give the bowl a jiggle and see if the trails settle. They should settle slowly after light jiggling. If not, then it is going to be too thick for flooding. Continue to mix in water if needed. If you have put so much water in that it no longer makes trails that stay then you might need to thicken it up with some powdered sugar.
You can use a stiff icing to pipe borders and then use a very thin icing to flood the cookie or use a medium consistency and do it all with one icing. I tend to do this more often.
Separate the estimated correct amount of icing needed for each color into separate bowls and color with a water-based food coloring until you get your desired colors.
Put the icing in separate squeeze bottles.