Sunday, March 18, 2012

French Baby Shower Cake Pops

I made these little lavender beauties for a French Baby shower for one of my friends, Susan. The dessert table was absolutely stunning with lavender and sage as the main colors.
{If I get some pictures of the whole dessert table I will post them!}


Susan's husband is French so they were planning on giving their baby a French name. So cute!


... and since I am so late with posting this..... she already had her baby!
It was a boy and they named him Luc. Just perfect. :)
He is so adorable too!

I made these cake pops out of yellow cake and dipped them in lavender vanilla coating and then finished them off with a lavender drizzle. Easy Peasy!

Here is the cake recipe.
Here is how to make the cake pops.
Here is how to dip them.

Saturday, March 3, 2012

Tasty Tangy Key Lime Tarts


Trivia
Did you know...

Key Limes are different than your run of the mill grocery store limes?
You can grow 2 limes trees with 1 lime seed?!
Key Limes originated in Southern Asia and are now grown mostly in
Florida Keys, Mexico and South America?
Key Limes are family with oranges, lemons and kumquats?
Key Limes are tiny!?
{Just larger than a walnut... I was not expecting this when I was looking for them!}


Did you know...
Key Limes have more Vitamin C than other varieties and are therefore more tart!?
Did you know Key Limes are actually hard to find unless you have a gourmet grocery store?
{I found mine at Harmon's. If you can't find them you can buy bottled juice online but it is inferior to fresh squeezed limes as usual.}

Well.... now that you know the Key Lime up close and personal it's time to make dessert.
Today we are going to make Key Lime Tarts.
Yes, they are as good as they sound.
No, I don't have any idea what I'm talking about.
Confession: I have never had a tart in my life.
 Another confession: I think I might love tarts.
{With my whopping sample size of 1, I can't really determine
 if it's the tarts I love or this tart specifically}


Either way....it was dang good and you should try it. 

Here's the recipe.

Tasty Tangy Key Lime Tarts
Yields: six 3 inch tarts (can make these into mini tarts {~24} like the original recipe states and you can easily double the recipe if needed}

Graham Cracker Crusts (homemade or store bought)
8 ounces cream cheese, softened
1 large egg
1/2 cup sugar
4-6 tablespoons fresh squeezed key lime juice (I used 8 key limes)
2 teaspoons lime zest
Fresh whipped cream (optional)
Extra Lime zest for garnish

Notes: I bought graham cracker crusts that come in little tins for this recipe but next time I will try making smaller tarts with homemade graham cracker crusts because I think they will be a perfect size for a two-biter and the crust to filling ratio sounds wonderful. You can make this recipe with regular limes if you want to. I did not use whipped cream on these because I thought it was perfect the way it is, but feel free. =)

Preheat the oven to 350 degrees.
Prepare graham cracker crusts if needed. If using pre-made crusts with tins, set these on a baking sheet. Squeeze your lime juice and make sure you strain it before you use it in the recipe.
Beat together the cream cheese, egg, sugar, lime juice and zest until well mixed. Taste the mixture to make sure there is enough lime flavor for your liking. Add more lime juice if necessary (or zest, but don't add too much of this or you will start to notice the zest texture in the final product). Fill crusts to the top with the mixture. Bake for 10-12 minutes for minis or 15 minutes for 3 inch tarts (ovens will vary). The tops will puff up quite a bit during cooking and then fall back down once cooled. The tarts are done once they look dull on the top. Remove tarts from oven and cool. When completely cool you can whip up your fresh whipped cream and dollop a bit on top or use a pastry tip. I just garnished mine with a bit of fresh lime zest and it was very pretty and perfectly delicious.
{Adapted from Paula Dean's Recipe for Key Lime Tarts}


These were so light and refreshing. They are the prefect ending to a dinner party or family meal. It is definitely not heavy and the perfect amount of sweet fruitiness to satisfy that sweet tooth.

Well friends, I think I'm getting another craving for key lime tarts.
I need to make some again and soon. 


Did you know....
Key Lime tarts make great gifts!?!


 Go ahead and give someone a tasty green treat for St. Patrick's Day or take some mini tarts to your work or friends. It will be the perfect touch for the holiday and your recipients will be thrilled!
...just don't forget to share.

Friday, March 2, 2012

Cupcake Vending Machine by Sprinkles

This is just crazy enough that I had to post about it.

A Cupcake Vending Machine.
That's right, folks.
Sprinkles has done it.


Sprinkles was the first cupcake shop that opened up (at least that we know of).

Here is the article that I just read.

The {pink} 24-hour Cupcake Vending Machine will be restocked day and night to provide freshly baked cupcakes for whenever your craving pangs you. Even at 3:00 in the morning!
If this can be executed properly then this could be an amazingly delicious success for mankind. I know many a people who NEEDED a cupcake in the wee hours of the morning.
So if you live in a Sprinkles zone, you should go give it a try and tell me how the experience was.
I am super curious to know.

Not only can you satisfy your sweet tooth but you can satisfy your pooch's too!.
The vending machine will also dole out doggy cupcakes
{Which I really think they have no choice but to call them "pupcakes". Teehee.}
Additionally, they will also sell mixes and apparel.

As if a cupcake vending machine isn't enough, Sprinkles is going into the Ice Cream business. They will be serving fresh gourmet ice cream along with brownies and other baked goods.
Sounds delicious.

So there you have it.

Go get your cravings satisfied and let me know how it goes!

Monday, February 20, 2012

Mardi Gras Cake Pops Featured

My Mardi Gras Cake Pops were featured in a Mardi Gras inspiration board on another blog!
{Maybe I'm silly but it's always fun when that happens!}

Check it out!

Thursday, February 16, 2012

Yellow Ruffle Cake for Photo Shoot {Yellow Cake with Buttercream Frosting}

In case you have tried searching for my yellow cake recipe on my blog and have ripped out your hair trying to find it (ok....maybe I exaggerate), here it is. I put "Yellow Cake" in the title so hopefully the silly blogger search engine will be able to find it easier. ;)
So, I was asked to do a yellow ruffle cake for a 1st year birthday photo shoot.
Meet Evelyn. (She's so cute!)
I really LOVE how this photo shoot turned out.
Check it out!


Haha. I love it. ;)

Aren't these pictures just AMAZING too! 
They were taken by Peekaboo Photography in Pleasant Grove, Utah.
Check out her website! You HAVE to look at the newborns!

Yellow Cake Recipe:
Yields: Two 8 or 9 inch round cakes

1 cup unsalted butter
1 ½ cups sugar
8 egg yolks
¾ cup any milk
1 ½ tsp pure vanilla extract
8 oz (2 cups) cake flour
1 tsp baking powder
½ teaspoon fine sea salt

Preheat oven to 350 degrees F. Grease cake pans and then flour the pan lightly to allow easy release of cake from pan. Mix together the flour, baking powder and salt. Set aside.
Cream together the butter and sugar until light and fluffy. Beat in the egg yolks one at a time. Stir in vanilla. Beat in the flour mixture (3 portions) alternating with the milk (2 portions). Start and end with the dry ingredients. Mix only until incorporated. The batter will be thick.
Pour batter into cake pans (about half full).
Bake pans in the oven for 25-30 minutes (cupcakes will be done in ~12 minutes if making those) or until the tops springs back when lightly touched or the cake passes the toothpick test. Cool completely in the pans.

Vanilla Buttercream Frosting:
Yields: approx 1.5 cups (I have never actually measured....I should do that)
 
Ingredients
1 stick (1/2 cup) unsalted butter
1/2 cup butter flavored shortening
Pinch of salt 
1 tsp pure vanilla extract
1 lb (4 cups) powdered sugar (can use less if desiring less sweetness)
2-3 Tbsp heavy cream (can use milk but cream makes it sooooo creamy! Shhhh....it's a secret)
  
In the bowl of an electric mixer fitted with the paddle attachment, beat together the butter and shortening on medium speed until soft and combined. Add vanilla and salt and beat. Reduce speed and slowly add the powdered sugar; beat until well combined. Add about 2-3 tablespoons cream/milk to make it creamy and the consistency you want. Mix for about 2 minutes (yes...do it!) on a medium speed to make it deliciously creamy. Add food coloring (water based) a little at a time until desired shade.
{Don't like overly sweet frosting?! A trick to make it less sweet is to use the store's cheaper brand of powdered sugar because it has less sugar and more cornstarch than C&H sugar. Food for thought}

Share and Enjoy.

Tuesday, February 14, 2012

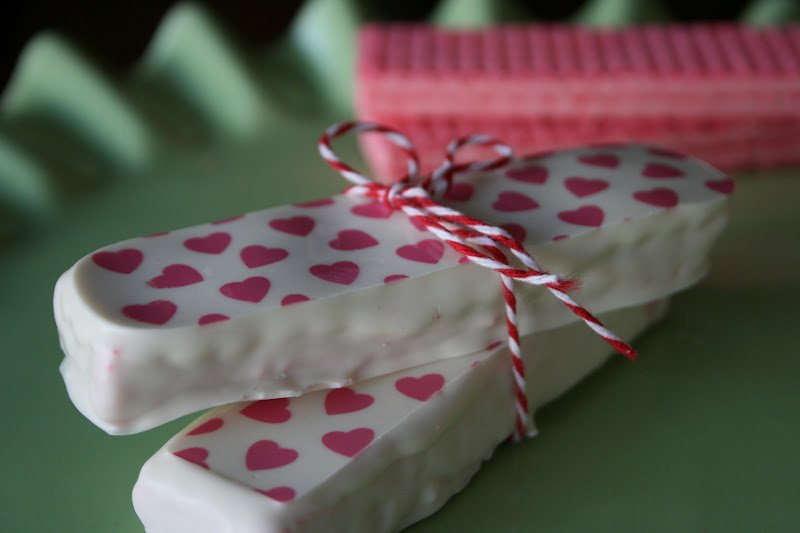
Love Bars for Valentine's Day

L is for the lovely lemon tarts. 
O is for the oreo truffle hearts.
V is very, very, extra delicious and cherry.
E is even more than any treat that you adore.

Bake is all that I can do for you.
Cake is more than just a treat for two.
Two cups sugar can make it,      
Take my tart but please don't break it.
Dessert was made for me and you.

'Tis the season of love.

It's that time of year to show those you love just how much you really appreciate them.
There really are a million ways to show them but nothing says "I Love You"
like a homemade treat made by you with love.
Here is a quick and easy dessert you can throw together for your favorite someone
 or give with Valentine notes to all you admire.

I call them Love Bars.


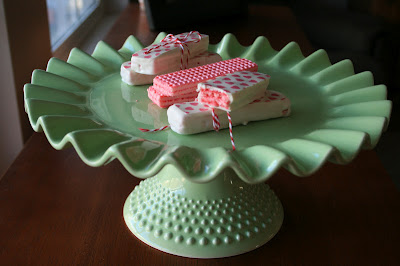
Pink and White really are just the cutest combo
(and even better when paired with this stand!)
So simple yet so cute.


Amazingly awesome dessert stand I just can't get over provided by my Dad and MJ.
Thank you a million!

Love Bars

What you need:
Wafers (I used Strawberry because they are pink....and strawberry)
White Melting Wafers/Chocolate (I used Guittard Vanilla A' Peels from Orson Gygis)
1 Transfer sheet with Valentine design (You can get these at local craft/bakery stores or online)
Double Boiler
Dipping Tool (Can use a plastic fork with 2 middle prongs broken off)
Parchment Paper
Baking Sheet

Bring an inch or two of water in a double boiler to a simmer and then remove from heat. Place the melting chocolate in the top boiler pan and place on the bottom pan. Allow the chocolate to melt slowly and stir frequently to distribute the heat. In the meantime, place parchment paper on one or two baking sheets (depending on how many you want to make) and take your wafers out of the bag. Remove your transfer sheet from the plastic cover. Use scissors to cut the transfer sheet into the rectangle shape of the wafers. Make enough for each wafer. Try not to cut a lot of excess around the sides of the wafers because those transfer sheets can be expensive ($3-7 each 8 x 11 sheet). Once chocolate is melted, put a wafer in the melt and gently cover it with chocolate completely. Remove the wafer from the melt by placing dipping tool underneath wafer and lifting up. Allow excess to drip off back into the bowl for about 5 seconds. Very lightly scrape a little bit of the excess melt off the bottom of the wafer while transferring over to the parchment. Carefully, place the wafer on the parchment and slide tool out from underneath. (This can take a little practice but you will get it as you figure out what technique works best for you). Repeat for all of your wafers (if dipping more than 20, stop there and continue on to the next part then come back and do the rest).
Take a transfer sheet piece and gently place (cocoa butter side down- it will feel ever so slightly rougher than the top) on a covered wafer. Very lightly smooth out the surface of the transfer sheet onto the chocolate. Make sure all of the transfer sheet is touching the chocolate. Don't push hard or you will displace your chocolate and it will squish out from under the sheet. Repeat with all wafers. Allow to dry (can put in fridge if you need to speed up the process). 
Once dry, carefully remove the plastic backing by lifting up on the plastic and slowly peeling back from chocolate. Make sure you remove the plastic from ALL the wafers. It is usually clear so don't forget any! 
  See the plastic? Exactly.....make sure you remove it because your love peeps won't!

Tie two Love Bars together with some pink or red twine
 and attach a Love Tag to it for an extra little touch. There you have it. 
Love Bars.


These were SUPER Yummy. More than I even thought! You need to try them....now.
You can jazz them up with any transfer sheet for any occasion.
Enjoy.

Saturday, February 11, 2012

Super Bowl Football Whoopie Pies

Super Bowl.


That's really all you have to say to make your salivary glands go ape-nuts.
Is it really about the game? Eh. Some could argue, but even the biggest football fanatics will include "food" on their list of must-haves for game day along with a 72-inch plasma and a bunch of buddies.

Now, there is a portion of the gen pop who participate in the Superbowl
BECAUSE there is food involved. 

Sara- Enter Stage Left.

Super Bowl food is all about comfort and convenience if you haven't taken a close look at it lately.
Below, the game-day menu breakdown.

Foods must fall under one of the following categories:
Finger Foods {mostly one-handed allowing you to keep your eyes on the screen 98% of the time}
Crunchables with any type of dippins {especially those scoopey kinds ....64% faster dipping speeds than the average flat chip}
Cheese from a bag, box or can (It really does deserve it's own category, don't you think?)
Meat {Li'l Smokies, hot dogs, meatballs....again one-handed}
Canned or Bottled Beverages (making it easier to chest-bump your bros)

...And of course you can't forget about dessert. Now I do admit that when people think of Super Bowl, they probably aren't thinking about dessert. {I'll be honest with you. I don't even think about dessert. I am definitely a savory over sweet kind of girl oddly enough.}
BUT there are a lot of fun desserts you can make for the Super Bowl and everyone will appreciate that bite of sweet bliss at the end of their savory gorge. 

If you follow the guidelines as stated above then you can't go wrong and your dish of delights will vanish faster than the dreams of 50 football players at the end of the game. :)

My game fare?
Football Whoopie Pies
I saw these cute treats on this cute blog called Make Merry and had to try them because
#1- I have never made whoopie pies.
#2 - They look like footballs
So it just made sense to make them for the Super Bowl.
I thought they turned out really cute and they were pretty darn easy to make as well.
They were a definite hit at the 2 super bowl parties I went to.


These sporty beauties are pumpkin chocolate cakes with a maple creme filling.
I know....here, have a napkin to wipe that drool off your face.
If I haven't discussed my obsession for maple openly, consider this my confession.


The trick to this recipe is finding a mini-egg cake pan. I bought a set of pans (for both top and bottom of cakes...the bottom cakes had a little flat indent in the egg so it will sit upright once put together....did that make sense?!) off of amazon for about $80. I figured I can also use these for easter and other such things and they are heavy duty and will last forever, so why not? They make 25 cakes each tray so the trays are big and the cakes are little. I loved the size of these little cakes (about 2 inch long). They were the perfect 2-biter dessert (...or 1-biter if you're like my brother). You can obviously make them a bit bigger with a larger size of mold. You can get smaller trays online for around the $20 range (if you don't need 50 cakes at once) and you can just do multiple batches.

I did a little bit of searching and you can find these cake pans through amazon. Just click on the picture (Check all the links to see their availability)


This is the one I got (below). Have I mentioned I LOVE Chicago Metallic?


Chocolate Pumpkin Maple Creme Whoopie Pies


Filling (Makes enough for ~50 cakes)
1 cup powdered sugar
1 cup (2 sticks) unsalted butter, room temperature
1 7-ounce jar marshmallow fluff/creme
2 teaspoons maple extract

Cake
3 cups all-purpose flour
2 teaspoons ground cinnamon
1 ½ teaspoons baking powder
1 ½ teaspoons baking soda
¾ teaspoon salt
¾ teaspoon ground nutmeg
¾ teaspoon ground cloves
¼ cup unsweetened cocoa powder
6 tablespoons (3/4 stick) unsalted butter, room temperature
¾ cup dark brown sugar
¾ cup sugar
½ cup vegetable oil
3 large eggs
1 15-ounce can pure pumpkin
½ cup milk
Nonstick vegetable oil spray

Filling Directions:
Using a stand mixture, beat the sugar and butter until light and fluffy, about 2 minutes. Add the marshmallow crème and maple extract and beat until well blended for a couple minutes on medium speed. This is the right amount of extract. It seemed like a whole lot so I just did a little at a time and ended up using it all (if not a little splash more....oopsies. :) You can do this 2 hours ahead of time and leave at room temperature until ready to use. The mixture will look off-white due to the maple extract but it looks light enough against the dark cakes.

Cake Directions:
Combine the first 7 ingredients in a large bowl. Using a stand mixer, beat butter and both sugars until blended. Gradually beat in oil. Add eggs 1 at a time, beating until blended between additions. Beat in pumpkin. Add dry ingredients in 2 additions alternately with milk in 1 addition, beating to blend between additions and occasionally scraping down sides of bowl as needed. Cover with plastic wrap and chill batter for 1 hour.

Arrange 1 rack in bottom third of oven and 1 rack in top third of oven; preheat to 350°F. Line 2 baking sheets with parchment (for normal whoopie pies)  and spray lightly with nonstick spray or spray any molds you are using (for the footballs cakes). Spoon batter into the molds until it almost reaches the top of the mold and smooth out the top the best you can (I used a spoon with nonstick spray on it) or spoon batter onto the baking sheet to form cakes (about 3 level tablespoons each; about 12 per baking sheet), spacing apart. Let stand 10 minutes.

Bake cakes until tester inserted into centers comes out clean, about 20 minutes, rotating sheets halfway through baking. The cakes will puff up quite a bit but they keep their football shape quite nicely! Cool cakes completely on baking sheets/molds. Using metal spatula, remove cakes from parchment (cakes should just slide out of molds).
Repeat with remaining batter.

Prepare your cakes by cutting them carefully in half long-ways (see pictures). Take a look at your two sides.....they look.....different. The part of the cake that was touching the pan will be pretty and smooth (as shown in the pictures) and the top of the cake that was exposed to the air may look a bit rough. What I did was pair up the bottom of a cake with another bottom of a cake (and the tops with other tops ) so that each individual whoopie pie would match. I thought it would be kind of weird to serve 2 different looking football cakes at the same party so I just took half (all the ones using the bottoms) to one party and half (all the ones using the tops) to another (or you can save half for yourself for your personal after-game snack). There is probably a really easy and much better solution to this but this is what I did for now. :)

Put filling into a large ziplock bag but leave some out to pipe the laces. Snip off end with a good sized hole. Pipe filling onto flat side of a cake. Top with the flat side of another cake. Repeat with remaining cakes and filling. There was enough filling for 50 cakes.
{By-the-by, my mom gave me this awesome leaf platter 
and it happened to work quite well for a mock football field.}


Now for the laces.... Put some filling into a small ziplock baggie or piping bag with small round tip. I used a #2 tip for this but you can also just use a ziplock baggie with the tip snipped off real small. 
Pipe on your laces. There's no trick to it. It might take a little practice but there is no trick. Voila!
These are best enjoyed the same day they are made.... they won't last longer anyways.
These here cakes are tasty.


Well, I may have almost convinced myself to start enjoying football.........almost.
Enjoy.