Tuesday, November 20, 2012

Share the Love


I know some of you have wondered why I named my blog Share Dessert Company.  It shows when you repeat it and have a puzzled look on your face or ask me to spell it. :)
Actually, it was supposed to be just "Share" but obviously that name has been taken a thousand times over plus a good name explains what the heck you are about and isn't so mysterious. So since I originally started the website as a dessert blog I tacked on Dessert Company
Sounds good. Sure. I'll take it. 
As I started getting dessert requests coming in from everyone I know (and some I don't know across the country) I realized... hmm....I guess my name was a bit misleading. People think I have a baking business. Well I don't. Tee hee. :) I'm not legit. I have just done it for some friends and family. I decided I really didn't want to go in that direction so I decided to drop the "company" in hopes that I will stop confusing people.
So, now it is plain old Share Dessert. A blog about sharing dessert and other fabulous things.
 {I also thought dessert to me represents anything sweet and fabulous so I thought I would just keep a hidden play on words there all to myself because I'm a dork like that.}
So I just told you all this for no reason. This is completely beside the point.
Baha!
:)
My point! When I started this blog, I didn't just want to share recipes. 
I wanted to share my time, my talents and my self.
I thought, if I could just sell my desserts or generate some money somehow by providing a fun useful website then I could give it to people who really need it.
I don't need it. I have been blessed with opportunity in life and an amazing job came from it that has blessed my family beyond belief.

I often think of the lyrics to a song by Brad Paisley:
"To the world
You may be just another girl
But to me
Baby, you are the world"

And so I think, I could change someone's life. Even if it were only 1 person or even if it just changed someone's day, it would be worth it.
This is my life.
One Girl, One Goal.
To make a difference.

I planned to start a new section of the website at the beginning of next year but my lovely sister-in-law, Camille, did something that pushed me to start it now. 
She posted to her blog and sent out an email that said this:

"With the Christmas season approaching, I have been trying to come up with a way we can incorporate some service into our celebration.  Especially to help teach my young children about the true meaning of Christmas.  I have been wracking my brain, wondering what we could do.  And then the idea hit me this morning.  

Gather items to donate to the Huntsman Cancer Institute.

My sweet brother has spent a lot of time in hospitals, including Huntsman, during his cancer battle.  We know that it can be a sad and lonely place, and that not everyone has the amazing support that my brother has in his incredible wife, Sara.  I wanted to do something to help other patients fighting cancer.  So I started doing some research, and have decided I want to make "Essential Totes" for patients that are on an extended stay.  

This is where I ask for the support of all of my family, friends and even strangers. I will gather donations from now until mid-December.  We will then assemble and deliver the items with my girls (if they are allowed) as we get closer to Christmas.  If you feel like you could help out, PLEASE do.  We have seen the incredible suffering that cancer patients go through first-hand.  We have seen the ones that are lonely as well, and it is heart breaking.  If you would prefer to donate money, I can use that to buy supplies as well.  I can take checks, cash or PayPal (there is a button over on the right to donate).
...
I know that things are tight around Christmas...I have 4 kids, I get it...but if you could find any wiggle room to give, it would mean a great deal to us.  I plan on including a note in each bag saying that these are dedicated to Ben...the strongest person I've ever known.

Thank you in advance!

P.S. I promise to document this and put pictures on the blog as well."

 This brother of hers, Ben, happens to be my husband so this intuitively is something I care very much about. I want to help make this happen.

Ben and a fleece blanket made by family
 So lets embark on a journey to Share the Love and help others live a little easier or at least a little happier. In the new section of the website I'll provide ideas of different ways you can help whether global or local. I will also always be fundraising for a specific charity or event that I will post about as they come. Sometimes for big things. Sometimes for small things. I will share stories and pictures about who we have been able to make an impact on.
I have placed a "donate" button on the right side of the site to make things easy for those who would like to donate.

Please consider donating items or money to provide the gift of comfort this Christmas season to those suffering from a disease that knows no boundaries. I know first-hand how great an impact you can have.
Here are the items that we would like to include in the Christmas gift totes.

Christmas Gift Totes:
Tote (big enough to fit a magazine)
Fleece Blanket
Warm Comfy Socks
Cotton Gloves (to put on after lotion application)
Unscented Healing Lotion
Current Magazines
Playing Cards
Crossword/Wordsearch/Puzzle Books 
 Pens
Paper/Journal
Gum
Mints/ SPRY Mints 
Hand Sanitizer
Starbursts/ Life Savers
Biotene Mouthwash
Healing Lip Balm/Moisturizer (non-petrolatum based)
Thoughtful/Funny Story or Short Book
   Disposable Nail Files

All items should be new. If you have any other great ideas, please comment! If you have any questions about helping out you can email me at 
sara@sharedessertcompany.com

{Addendum: Wow! We have already received donations! THANK YOU! Updates with be posted to the main page HERE. Check there to see what we still need.}

   A big Thank You goes out to Camille for doing such an amazing job of dreaming up and organizing this project! You are an angel.
"And charity suffereth long, and is kind, and envieth not, and is not puffed up, seeketh not her own, is not easily provoked, thinketh no evil, and rejoiceth not in iniquity but rejoiceth in the truth, beareth all things, believeth all things, hopeth all things, endureth all things. Wherefore, my beloved brethren, if ye have not charity, ye are nothing, for charity never faileth. Wherefore, cleave unto charity, which is the greatest of all, for all things must fail— But charity is the pure love of Christ, and it endureth forever; and whoso is found possessed of it at the last day, it shall be well with him." Moroni 7:45-47
Charity is the pure love of Christ.
“Give what you have. To someone, it may be better than you dare to think.” -HW Longfellow

Get it Free Martha Stewart Downloadable Cookbook

 Get a FREE Martha Stewart Thanksgiving Cookbook!

Hey everyone!
A little bird just delivered this free cookbook to my email inbox.

I don't know if you have heard of the "Get it Free" website but it has a lot of offers for discounts, coupons and free stuff. You get an email with the daily deals and it varies widely on what is offered.
I previously got a free printed photobook and all I had to pay was shipping costs. Totally worth it! Today, there was this free downloadable cookbook by Martha Stewart and it features great chefs from FoodTV and more.

Anyway, click HERE to go to the free cookbook.
Please, let me know if the link does not work. You may have to log in and/or register for free to see it.
I just thought I would send this out since there are some really tasty looking recipes in this book plus it's FREE! Who doesn't love that?

So if you are interested in saving some money (in a legit way) then you should check out Get it Free.
{Haha... this is not a paid endorsement. I just like sharing awesome stuff with you}

Giveaway Winner!

I want to give a big THANKS!! to everyone who participated in the giveaway and spread the word about my new website redesign!
I'll have to do another giveaway when we get to 100 likes. :)

So without further ado, drum roll please!
{The winner was chosen randomly using random.org}
And the winner is .............
*
*
*
BRENDA SMITH!

Congratulations Brenda!
You won the Miette Cookbook!


I hope you enjoy this beautiful and tasty book!

Monday, November 19, 2012

Salt Pigs

I have yet another confession to make. 
I want a salt pig.
I have for a while now.
I actually don't really want the traditional cloak and dagger hooded salt pig. The only reason being it looks less functional.... I need to fit my whole hand in there and I'm not sure I could unless the thing is huge.

I like this one.

Of course you do, Sara, it's expensive.

Here are some more cute ones for you to peruse. You can click on any of these if you want more info from Amazon (Love them. Yep, I'm Prime).


Salt and Pepper Pigs. :)  Sounds delicious.


An acacia wood pig.

This one is from Paula Dean. You can separate different types of salts.
A marble pig.
Cloak and dagger hooded salt pigs

 So, why is the salt pig?
This is what Dr. Google said.
Theory #1: The unglazed interior absorbs moisture keeping the salt fresh and dry
Theory #2: Ceramic interiors keep the salt from clumping in a humid climate or kitchen
Theory #3: The top/hood keeps the soot and dust out of your salt

All very logical and probable.
My Theory: It's a lot easier than trying to open that dang salt container aluminum spout, dumping it into your hand, having to use two hands to decorate your steak with salt and then wasting the remainder every time you need to salt something. {Yes, I refuse to use a salt shaker.}

So... why is it a "pig"?
Well, a long time ago in a land far far away (Scotland) John McSmith got fed up with the little aluminum spout and put his salt in a little jar. According to the Scottish, a "pig" is a jar or container made from "earthenware" like clay or ceramic, and thus it was named.
Yep, proud to be Scottish. :)

Anyway, these little salt pigs are super cute and would make a fabulous hostess gift. Put some fancy Himalayan pink crystal salts in it and finish it off with a cutesy bow or some twine and a gift tag.

So, there you have it. Salt pigs. I want one.
But, wait, we haven't addressed the most important question of all.
"Is it ok to put kosher salt in a salt pig?"

Sunday, November 18, 2012

Cute as a Button First Birthday Party! {Fondant Cake}

This party idea was cute as a button! 
No. Really... it was a cute as a button party.
This theme was really fun and the buttons were way fun to make!


It was for a first birthday party. Very fitting.
I did a big fondant cake, button cookies, and cupcakes.


To make the button cookies, simply make round rolled sugar cookies (recipe found HERE). The button is made of a fondant circle so just use the same cookie cutter to cut out the fondant and then poke button holes using the end of a decorating tip. Wet the back of the fondant slightly so it becomes slippery and then put it on the cookie and tap down lightly. Allow to dry and it will stick very well.


The cupcakes and cake were made of yellow cake (the BEST ever yellow cake recipe found HERE) and yellow vanilla buttercream frosting with little decorative fondant buttons. Awwww,,,,, fer cute.


To get the ruffles, use a petal tip with the small end facing out. Spin the cupcake while applying even pressure to your pastry bag and move the tip up and down. When coming back around to where you have already piped the icing just continue on top of that layer and continue the ruffles until you come to the middle. Take a few tries doing a ruffle before going to your cupcake. 
To get the plain swirl use a large round tip (I think this one was a half inch) and starting in the middle of the cupcake cover the whole bottom in a swirl and then continue on top of that swirl and then again once more. Top it with a few cute buttons and done. Magnifique!


 Now for the big boy. The cake.
So I am no master of fondant but I got 'er done and you definitely can to if you choose to go this route. Here are a few tidbits for you to make sure it goes as smoothly as possible. I have seen many different methods of applying fondant so here is how I did it.
First off, bake your cake. This one was a 4 layer 8 inch cake. I actually did 2 purple layers and 2 white layers alternated so you got a pretty surprise when you cut into it. Then layer it up with frosting in between the layers. Cover the whole cake in a crumb coat and stick it in the freezer if possible or else just the fridge will do. Get it really cold so the buttercream doesn't smear easily. You are now ready to put fondant on your cake.


 I used Satin Ice white fondant that comes in tubs of different sizes. It's kind of pricey so you can also make your own but it's messy. I'll have to try it again sometime to see if it's worth it. I only did it once and it was back before I really got into baking seriously. Anyway...
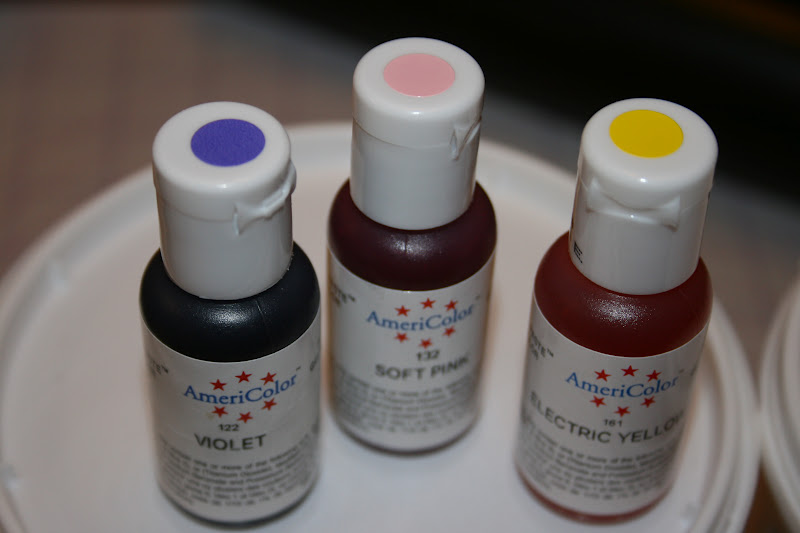
When tinting your fondant use water-based concentrated food gel (also called icing food coloring). You can always add more but you can't make it lighter unless you have enough to add more white fondant, so keep that in mind. You can get gel coloring at craft or baking supply stores. Walmart actually has some too in their specialty baking section by the wedding stuff. These (see below) are the colors I used (Violet, Soft Pink, Electric Yellow). Poke a small hole or indent into the fondant ball and then fold it over on itself so the color doesn't get all over. You might want to use gloves if you don't want your hands to get dyed. Knead the fondant until the color is evenly dispersed. Try to do it fairly quickly and don't let the fondant sit out because it dries out VERY quickly. This is the bane of my existence with regards to fondant. I think it is the toughest part of using fondant. So just try to work quickly. When you aren't using it, put it in an airtight bag or container.


 I bought this fondant mat to help me measure how big I needed to roll my fondant and it was definitely a good purchase. When using these it is recommended to rub the top with a very small amount of shortening to "season" it and make it more non-stick.


This was a big cake (I know...this is no wedding cake but for someone with next to zero fondant experience, this definitely made things trickier than it would have been had it been a smaller cake.) You want to measure the top and sides of the cake to see how large the diameter of your fondant circle needs to be. Add about an inch on each side to give yourself some wiggle room and find that number on the mat. You don't need to roll the fondant in a perfect circle but you need to cover that line around the whole mat. Make sure you have plenty of fondant to work with. That will also make your life easier. You can use the extra that you cut off for something else... like the buttons. Fancy that.
So, when you are rolling it out, do so very quickly or else you will get what is called elephant skin on your fondant. This is where the top of the fondant dries out and as you try to handle it it streches and looks like elephant skin like so.

Picture located HERE
 Roll it pretty thin but not so thin that it will tear when handling (decide based on your own comfort level). I rolled it too thin the first time and it tore so I kept it a little thicker the second time. I would recommend watching a few youtube videos before you try so you don't destroy your fondant. Some people use shortening on the fondant to keep it from sticking. I did not do that but maybe it would have made it easier. I'll try it next time.
Fondant is actually really fun to work with aside from the frustration that can occur so it would be really fun to be really good at fondant because it so pretty and I really like the look of it.


So form your fondant ball into a smooth ball and flatten it slightly and start rolling it out. You don't want any creases on top so make sure there aren't any before starting to roll. Roll it out quickly until it is as thin as you want. Now you can roll it up on your rolling pin or just stick your arms underneath it (I did this) and transfer it to your cake. Make sure you set it down right where you want it to stay. Get the middle of your fondant onto the middle of the cake. You can't slide it around on the cake.... it will likely destroy your cake (Having it frozen helps). You have to lift it off completely and then reset it if necessary. If you get buttercream all over your fondant and then have to completely start over... that's not good. You need to scrape off as much of the buttercream as possible, especially if the color of the buttercream will change the color of your fondant. What I am trying to say is do it right the first time.... and do it quickly. :) Easier said than done. It takes practice to do a good job.


So now quickly smooth the top of the fondant on the cake so it is level. Sometimes the buttercream will get distorted and smooshed so just make it level now that the fondant is in place. You can use your hand/fingers or a fondant trowel but just make sure to keep it light so you don't get dents and divots. Those will be there forever. :) now quickly smooth over the sides. You can make the corner sharp or smooth. It's up to you. I kept this one smooth and I like it a lot. Now on the sides lift the bottom of the fondant very slightly away from the cake and take your other hand and smooth the fondant onto the side of the cake. Go around the cake continually smoothing the fondant lower on the cake until you reach the bottom. This is the hard part. I always get wrinkles. You can smooth them out after they are there. Again, they are there forever. I need to practice more and then I can give you tips but until then I will have to refer you to youtube. Luckily....many fondant cakes have thick ribbons on the bottom because they just look beautiful so that hides most of the wrinkles. 
Lucky me. :)
So now place your ribbon on your cake. I like to use long pins. Just take them out before you cut into the cake and eat. :) You should be taking off the ribbon too... unless you made an edible one.
Now you are ready for the fun part! The buttons!


The buttons on the cake were the funnest and easiest part of the whole process. I separated my fondant into 3 balls and dyed them different colors. I used a mini fondant roller with a spacer (the little rubber band like thing that keeps the thickness even when rolling) to roll out a sheet of fondant. I then actually just used my icing decorating tips to get the different sizes of holes and designs (using both the small and large ends). I even used the "hair/grass" tip for a fun decorative button. That's it! I left them on a cookie sheet covered in parchment paper for them to firm up a bit before I man-handled them onto the cake.


They will not harden. That's where gum paste comes in...


If you want to make a decoration that hardens and can "stand up" on a cake like this number 1, then you need to involve gum paste. Gum paste hardens when left out. Fondant just gets chewy and becomes less elastic but will not harden enough to stand up on its own. You can use all gum paste or do a 50:50 mix of fondant and gum paste. Ether should work fine (depending on the humidity in your local area so make it ahead of time just in case. This is usually not eaten so it will last until you destroy it or the elements do.) I mixed the fondant and gum paste together and then tinted it to the color I wanted, rolled it out to a thickness where I wasn't worried it would accidentally break and then cut it. I drew a number 1 on a piece of paper the way I wanted it and then cut it out, placed it on top of the rolled out fondant and used a knife to cut it out. Be careful cutting on the fondant mat. It is not meant to be cut on. Once it was cut out I just let it harden overnight. Voila!
One thing you actually don't see in the picture above is that when I was cutting out the number 1, I left a piece on the bottom that would let me stick it into the fondant so it would stand straight up. Kind of like so.... :)

I love paint. :)
 Use a knife to cut a small slit into the cake and then insert the number 1. When you are ready to place your buttons, slightly wet the back side and apply it to the fondant. Smooth it out.You can place them however you want to. Cake is done!
With regards to refrigeration. I personally do not have experience because I have not refrigerated my fondant cakes. However, I have heard that Wilton fondant does not refrigerate well while Satin Ice does. It depends on the humidity of your fridge as well. Refrigeration right after you put on the fondant can prevent bulges and allow the cake to keep its shape but may also produce sweating. Bulging can definitely be an issue in fondant cakes. So if it is a really important cake then you may want to give it a trial run in your own elements and conditions first.
So there you have it.
Awww....


The perfect party theme for your cute little button.

Wednesday, November 14, 2012

Share Dessert Giveaway!


Attention everyone!
We have reached 50 likes on Facebook!
Wahoo! Yippee! Geep Geep Oorah!
Ok, so it's not really that many in all actuality but I think it's pretty cool because I love my little blog and I'm glad a few others do too.

So, let's celebrate (because why not?) with a giveaway and see if we can get even more likes and spread the word!
Plus, who doesn't love free stuff?
But first!

I want to tell you about an absolutely adorable little pastry shop in California called Miette.
I just love the name since "miette" means "crumb" in French. So perfect for a pastry shop. The store is cute, the desserts are cute and even the book is cute! The edge of the pages are scalloped. I love it.
If you are in the area you should definitely stop by and see for yourself.


Look at some of the desserts they have:

Princess Cake
This just looks divine, doesn't it?

Scharffen Berger


So for you my friends, I have a book to share with you. This book.


There be secrets in here.
I received this book from a dear friend (... not the same book you are getting). ;)
I love mine and know you will love yours.

It's simple.
  1. "Like" Share Dessert on Facebook
  2. Share or post about this giveaway on your status
  3. Comment below that you did the above and tell me what kinds of fabulous things you would like to see featured on this blog. ie: more holiday/themed desserts, DIY Christmas decor or furniture, cost savings, awesome websites, vintage stuff.... what are YOU most interested in?
    {remember it's a blog about ALL things fabulous so the sky's the limit!}
One entry per person please (and make sure to leave your name! Email is optional) U.S. entries only. 
Contest ends on Monday, Nov 19th at midnight (Mountain Time).
Winner will be chosen at random on Tuesday.
Check back on Wednesday to see if you won!
{If you leave your email I will email you directly also.}
Good Luck!
Hey.... this would make a pretty nice Christmas gift for someone. wink. wink.

Tuesday, November 13, 2012

Buttercream Rose Cake

If you are looking for an elegant yet super easy cake, you really need to consider a rose cake.
This cake takes less than 5 minutes to decorate.... seriously.


I made this cake for my grandfather's 80th birthday party.
It is an 8 inch double layer spice cake with vanilla buttercream frosting.
Did I mention this is my favorite cake flavor combo EVER?
{It also happens to be my wedding cake flavors.... fancy that.}
You will have to forgive me for not posting a spice cake recipe. The balance of spices in a spice cake is so vital that, alas, I am still working on finding the perfect balance. 
You may find a delicious vanilla buttercream recipe HERE (keeping in mind the substitutions below).
When making your buttercream, if you want a very white icing then make sure you use clear vanilla extract as well as a pure white/clear shortening with or without some clear butter flavoring. Don't use butter because it will make the buttercream yellowish. I completely forgot to use clear vanilla so I got an off-white cake as you can see. It looked really cute but if I needed to have a white cake, that would have ruined my next 15 minutes (then I would have gotten over it), but still!


To get this look you just start with a cake that has a crumb coat and use a 1M star tip 
{The same kind you use for those swirly cupcakes}.
To make an individual rose you just start in the middle and circle around about 2 times and then release and drag the tail around to hide it. 
To make this cake you just do the rose over and over again all over the cake. There is really no science to it other than making sure your size of roses will fit the cake well. 
This also takes a lot of frosting so make more than you think you need and save the extras.
I actually ran out before I could do all my finishing touches but it turned out great still.


After you are done doing roses on the top and sides of the cake, sprinkle the cake with a few silver dragees to give it an extra special touch. Don't worry, they are edible! They really finish off the whole look quite nicely me thinks.


Again, this is really fast and easy after a few practice swirls. You can definitely do it!
Look how great it looks at the end!
One of these days I need to do a tiered cake with roses.
I think it is simply beautiful.