Showing posts with label DIY. Show all posts
Showing posts with label DIY. Show all posts
Monday, November 12, 2012
New and Improved Share Dessert Blog!
Hello and welcome! My name is Sara.
I have decided to change up the website a bit. Besides the beautiful re-design that I absolutely love I have decided to share ALL of the fun things that I love especially since I hope to be taking on a long and loving project of redesigning my home... by myself. {Eek!}
Since we moved in 3 years ago, I have only done 1 thing to change the inside of the house and that would be painting one of the bedrooms a vibrant pink.... yeah, a whole room of pink looks a lot different than a small swatch of pink. :) I might keep it and see if I can salvage it (probably not). I do like the color.... there's just A LOT of it. Anyway, I shall introduce you to my home as we continue the journey.
I have a fine appreciation for fabulous things. All those little things that make you smile.
What's fabulous in my book? Anything that is pretty, efficient, has character and that helps others.
Simply put, this is now a blog about all things fabulous.
I have come to have a far greater appreciation for those tiny good things in life that we often so much take for granted. This appreciation has grown through trial as is often the case. My husband has terminal cancer and only has days to weeks to live. When you count life in numbers of hours and days you start to appreciate very small things like the smile on your husband's face, the way his hair sweeps across his head or the cute oddities of his personality that you may have once found peculiar. You even more appreciate the beauty of snowfall, a piece of hand-crafted furniture and the love that strangers can have for each other. Time seems to slow down and you have a lot of time to think about what really matters. What matters to me? God, family and making life the best it can be for myself and others. "... men are that they might have joy." 2 Nephi 2:25
My vision for this site is to be a resource to find awesome ideas of all sorts that you can do at home to bring a smile to your face while also saving money or salvaging used materials. I really don't like to waste (it hurts me) and with just a little bit of elbow grease, old items with character can be made so beautiful again while also saving the earth and money! And so with you I will share my desserts and share my journey.
The other more important thing I hope to do is help others along the way however I can whether it be baking for a bake sale or giving a restored item to a charity auction. Join me in the cause to make this world a friendlier and better place for everyone.... one cupcake at a time.
~Sara
Sunday, November 11, 2012
The Yellow Cape Cod
I recently stumbled upon an amazing site while looking for decorating inspiration for my home.
by Sarah Macklem Interiors
Sarah offers TONS of ideas and tutorials for Do-It-Yourself projects, interior design, holiday deco and style for the home.
According to her website, "Sarah's goal is to help "Real People" create a home that is beautiful, functional, practical and unique. The purpose of The Yellow Cape Cod Blog is to empower and inspire others
to create a home filled with beauty and character, one simple,
inexpensive project at a time." I agree!
She has such a great sense of style and can really make a room WOW you.
Here are some of my favorite posts of hers.
Click on the picture to be taken to the page.
 |
| Pottery Barn Worn Black Paint Finish Tutorial |
 |
| Chevron Wall Paint Tutorial |
 |
| Tile Grout Makeover |
 |
| Bedroom Style |
So pop on over and take a browse real quick.
I added her link to my favorite websites on the right of the page -->
{Check out all these awesome pages. They are my favorites.}
As I set out to renovate, beautify and personalize my cozy home I will definitely be looking to her blog for some inspiration and tutorials! I hope you will find it useful too!
~Sara
Thursday, February 16, 2012
Yellow Ruffle Cake for Photo Shoot {Yellow Cake with Buttercream Frosting}
In case you have tried searching for my yellow cake recipe on my blog and have ripped out your hair trying to find it (ok....maybe I exaggerate), here it is. I put "Yellow Cake" in the title so hopefully the silly blogger search engine will be able to find it easier. ;)
So, I was asked to do a yellow ruffle cake for a 1st year birthday photo shoot.
Meet Evelyn. (She's so cute!)
I really LOVE how this photo shoot turned out.
Check it out!

Haha. I love it. ;)
Aren't these pictures just AMAZING too!
They were taken by Peekaboo Photography in Pleasant Grove, Utah.
Check out her website! You HAVE to look at the newborns!
Yellow Cake Recipe:
Yields: Two 8 or 9 inch round cakes
1 cup unsalted butter
1 ½ cups sugar
8 egg yolks
¾ cup any milk
1 ½ tsp pure vanilla extract
8 oz (2 cups) cake flour
1 tsp baking powder
½ teaspoon fine sea salt
Preheat oven
to 350 degrees F. Grease cake pans and then flour the pan lightly to allow easy release of cake from pan. Mix together the flour, baking powder and salt.
Set aside.
Cream
together the butter and sugar until light and fluffy. Beat in the egg
yolks one at a time. Stir in vanilla. Beat in the flour mixture (3
portions) alternating with the milk (2 portions). Start and end with the
dry ingredients. Mix only until incorporated. The batter will be thick.
Pour batter into cake pans (about half full).
Bake pans in the oven for 25-30 minutes (cupcakes will be done in ~12
minutes if making those) or until the tops springs back when lightly touched or the cake
passes the toothpick test. Cool completely in the pans.
Vanilla Buttercream Frosting:
Yields: approx 1.5 cups (I have never actually measured....I should do that)
Ingredients
1 stick (1/2 cup) unsalted butter
1/2 cup butter flavored shortening
Pinch of salt
1 tsp pure vanilla extract
1 lb (4 cups) powdered sugar (can use less if desiring less sweetness)
2-3 Tbsp heavy cream (can use milk but cream makes it sooooo creamy! Shhhh....it's a secret)
In the bowl of an electric mixer
fitted with the paddle attachment, beat together the butter and shortening on
medium speed until soft and combined. Add vanilla and salt and beat. Reduce speed and slowly add the powdered sugar;
beat until well combined. Add about 2-3 tablespoons
cream/milk to make it creamy and the consistency you want. Mix for about 2 minutes (yes...do it!) on a medium speed to make it deliciously creamy. Add food coloring (water based) a little at a time until desired shade.
{Don't like overly sweet frosting?! A trick to make it
less sweet is to use the store's cheaper brand of powdered
sugar because it has less sugar and more cornstarch than C&H sugar. Food for thought}
Share and Enjoy.
Wednesday, December 14, 2011
Winter Wonderland Birthday Party {Decorated Sugar Cookies, Cake}
Christmas is right around the corner! I can't believe it!
Nothing fits a December birthday better than a Winter Wonderland Birthday party!
Nothing fits a December birthday better than a Winter Wonderland Birthday party!
This party was inspired by Fresh Chick's Winter Candyland birthday party theme.
My friend organized this birthday party for her 3 year old daughter and it turned out super cute.
My friend organized this birthday party for her 3 year old daughter and it turned out super cute.
{Complete picture added to the end}
She went with a variety of winter cookies and a cake!
She went with a variety of winter cookies and a cake!
I love these little penguin cookies! In all honestly, these were super easy cookies to make.
The key is to make sure to add enough black food coloring to get a good true black color.
Hint: Your icing will get darker as it sits so your icing may look like a dark grey to begin with (like mine did) and will 'mature' into a black color like these penguins. You can let it sit for a short time and see if it darkens or you can just get it a dark grey and go to town. You don't need to add enough color to get it black right away.
For these cookies, use this rolled cookie dough recipe and roll out to 1/3-1/2 inch thick. Use an oval cookie cutter of your size choice to make the cookie base. Let them cool completely before decorating.
Make this royal icing recipe and thin it out to a medium consistency to be able to both pipe borders and flood. Separate the icing out into separate bowls to tint to the correct colors (black and orange). Use a water-based food coloring. I prefer gel colors because it doesn't thin your icings out. You don't need much orange at all. Put your icing in squeeze bottles for easy application. I put my orange in a little ziplock baggie and snipped the tip off.
Pipe a border around the edge of the cookie creating an oval then flood the cookie with the black icing. Give it a shake to even out the icing. Move on to the next cookie. I leave my cookies out on a cookie sheet. The icing will keep the cookies moist so don't worry about refrigerating or covering while decorating your cookies. Let the icing dry enough so that it looks more dull than shiny (It might be ready by the time you finish the rest of your cookies). A little shine is ok as long as it looks firm enough to pipe more icing on and not sink in or bleed. Once dry enough, pipe a border of the white icing to duplicate the white pattern that you see below and then flood it. Allow this icing to dry in the same manner. Make sure you are capping or covering your squeeze bottles in between use so the icing doesn't dry out.
Next, give him some eyes with just a small dab of icing and give hime some wings. I just press and released as I pulled away. I then used a little toothpick to make it look like I wanted. Now give Mr Penguin some feet and a nose. The tip opening should be very small so you can control the icing. Just do a little triangle for the nose and the design you see below for the feet. I used a little toothpick on the nose if it didn't turn out how I wanted it. Voila! Penguin. Fer cute!
Who doesn't love penguins, honestly?
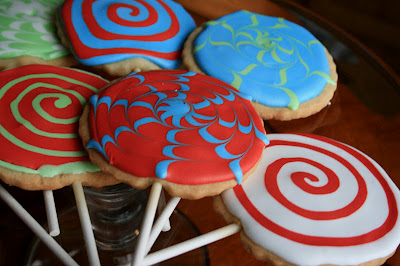
Next up are Cookie Lollipops!
What?! But lollipops have sticks?! ...and so can cookies. Very easily might I add.
I wish I had taken a picture of the cookie making process for these lollipops but I didn't so this explanation will have to do for now.
The Stuff List: Same cookie dough recipe and 6 inch lollipop sticks....That's it.
Roll these out the same way and cut into circles (whatever size you want them to be). Mine are 3" cookies. Now take your stick and press it lightly onto the top of the cookie extending at least to the center of the circle. You don't want your cookie to fall apart because the stick wasn't in enough. Now get a bit of dough and roll it into a ball. Flatten it with your fingers and place over the stick. The dough should cover the stick and quite a bit around it so it will be secure and snug. Very lightly press the cookie dough disc flattening it to the cookie. Press the edges so they kind of blend with the cookie. ( ...I should do a video. I will someday I promise!)
Using a thin metal spatula, carefully flip the cookie over, place on an ungreased cookie sheet and cook as directed by the recipe. Not too bad. The cookies are suprisingly sturdy. I thought they might be crumbly or fragile but they are quite solid. Let cool completely on the cookie sheet before removing.
To get this cool design above, flood your cookie as described above with red icing. Immediately after, draw four lines, with blue icing, across the cookie crossing in the middle. Using a toothpick, start in the middle of the cookie and swirl around circling the cookie about 5 times. Shake gently.....notice the blue and red cookie in the background above.....I shook a little too vigorously and my border got overrun. Let dry.
There is no wrong way to decorate sugar cookies so experiment and have fun!
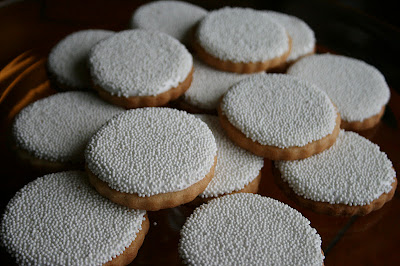
Personally, I don't think winter is complete without snow or snowballs!
These cookies are super simple to make. {The simplest of the bunch}
Simply cut out small circle cookies (mine had a little ruffle around the edge), flood with white icing and sprinkle with white non-pereils. I flooded all the cookies and then went back to sprinkle so the non-pereils wouldn't sink into the wet icing too much. It probably doesn't matter. Just make sure it doesn't dry before sprinkling.
To make these cute mittens (below), I flooded the top of the mitten with a color (and design if applicable) and let it dry while I did all the cookies. I then went back and flooded the bottoms with white icing and sprinkled with white non-pereils. Make sure the other part of the cookie is pretty dry so the non-pereils don't stick to something you don't want them to stick to.
When the red icing was dry, I piped on the white snowflake and placed pearls at the ends of the snowflake and in the middle. Not too bad.
To get the design below, flood the cookie with blue icing and then draw four green lines across the cookie. Using a toothpick, drag through the icing straight up and then down, then, up and down again. Give the cookie a shake to level it out.
The wrapped candy cookies were quite an adventure for me. I could not find a cookie cutter anywhere and of course I waited too long to be able to order one on line. :) So......
...I made my own cookie cutter. It was totally fun and gave me a sense of empowerment. :)
It actually wasn't as difficult as I thought.
I bought a "make-your-own-cookie-cutter" kit from Orson Gygis and decided to give it a go.
The kit came with the wood board with peg, a ribbon of metal and some tools (for round edges and sharp edges) needed to form the cookie cutter and an adhesive to secure the ends together. Not bad for $15. It will make about 3 cookie cutters and then you can buy refill metal ribbons for about $5. So now I can make whatever shapes I want! For cheap! No restrictions!
The result?....
Sweet! (Literally...)
This would make another good video....dang it. I need to get on that.
So...... Homemade Cookie Cutter + Cookie Dough =
I think they turned out rather swell, don't you?
For decorating, I started with the center and flooded with the solid color (always remember to create a border first!). My icing was starting to thicken and dry a little at this point (especially the green and red) so you can kind of see the lines where I dragged the toothpick. To prevent this, just add a very tiny bit of water to thin it out slightly before piping/flooding.
To get the polka dots below, simply place a small drop of white icing onto the still wet flooded icing. It will sink in and look like this.
For the wrapper ends, draw a border, flood with icing and let dry. Then go back over the border and add some pleats to the wrapper with 3 straight lines. Cute!
...And the cake.
This is an 8 inch cake and has 3 layers with a sweet cream cheese in between and vanilla buttercream on the outside.
I am going to give this cake its own post so stay tuned.
So, you put it all together and whaddya got?
{Pictures curtesy of the host}
Great Job! I love it!
Friday, November 18, 2011
Party Like a Rock Star!
Who doesn't love to Party Like a Rock Star?!
...I mean in the slushy punch/make your own music videos kind of way.
Yeah Baby! Rock on, right?!
Well, we lived it up on Saturday!
My niece's 8 year old birthday party was rockin'!
We had an on-set makeup and hair studio
with professional make-up artists
(mom, grandma and aunt)
and some super wild karaoke! and a photo shoot!
The girls were split into 2 groups and a music video dual commenced.
Here the girls are watching their videos
We topped it off with desserts fit for a rockstar, presents and a party favor CD! ... Phew!
I made a custom CD that featured the 2 songs the girls made music videos to in addition to about 20 other popular songs! Paired with Rock Candy and tied with a Rock Star bow, this favor turned out perfect!
The girls had so much fun giggling and rockin' out. Many of them said this was the best birthday party they have been to! Success!!
I am glad to have been a part of it.
So if you are looking for the perfect birthday party for your wee one. You should consider a Rock Star Party if they are into music and that kind of fun....honestly, this would also be way fun for a crazy adult party! Let loose!
So! Onto the fun...
Q: What kind of treats do Rock Stars eat?
A: Anything hot pink of course!
The theme colors were Black and Pink. Classic!
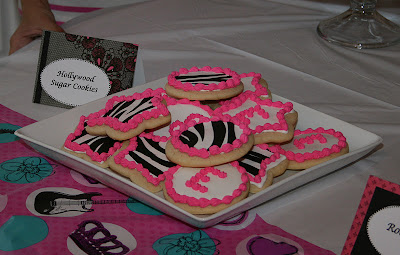
I absolutely had to incorporate zebra because nothing screams "Rock Star!" more. The best dessert for that would be cookies...
And so they were.
These cookies are not difficult to make but they do take some time because there are multiple steps involved.
I tried out a new sugar cookie recipe and I do like it better. I am still on the search though. Here is the recipe for this one. It is very tasty! I couldn't stop eating the dough! It was embarassing. I dare you to try it.
Rolled Sugar Cookie Dough
1 1/2 cups unsalted butter, softened
2 cups sugar
4 eggs
1 1/2 tsp pure vanilla extract
23.5 oz (5 cups) all-purpose flour
2 tsp baking powder
1 tsp salt
Cream together the butter and sugar until smooth. Beat in the eggs one at a time and add the vanilla. Stir in the flour, baking powder and salt until combined and uniform. Form into a big flat rectangle and wrap in plastic wrap. Refrigerate for at least 2 hours or overnight.
Preheat oven to 400 degrees F. Roll out dough on a floured/sugared surface to 1/4-1/2 inch thick. Cut into stars and circles with cookie cutters. Place the cookies 1 inch apart on parchment lined baking sheet. These should not spread much at all. Bake for 6-8 minutes or just until the edges barely start to brown. Do not overcook. This type of cookie is better soft than crunchy I think. Let cool completely before icing.
TIPS: When I "flour" my surface, I actually like to use part flour and part powdered sugar so the cookie has less of a flour taste and more of a yummy sweet cookie taste. If your cookie cutters tend to stick to the dough, first dip it in flour. Also flour your rolling pin of needed. I use a non-stick rolling pin but sometimes (depending on the dough) find myself needing to flour it also as well as putting some flour on top of the dough before I roll.
When you press down on your cookie cutter, very gently wiggle it a little to separate it from the rest of the cookie dough. Wiggling too much may deform your shape so don't do that. With this cookie recipe at the right thickness it actually sticks in the cookie cutter. Nice! Then you can gently push it out at the edges and place on the parchment paper lined baking sheets. If the dough does not come up with the cutter then use a thin metal spatula to slowly lift up the cookie just at the edge.
This icing recipe I love and will not be searching for another one.
It is from Sweet Dani B.
Royal Icing by Sweet Dani B
1/4 cup meringue powder
1/2 cup cold water
1 lb powdered sugar
Food coloring (water-based)
Using a handmixer, beat together the meringue powder and the water until you see good trails where the whisk has been. Slowly beat in sugar until well blended and you see trails again. This icing will probably be pretty stiff. Take some out (like 1/4 of it) to use for the pink finishing borders.
Thin the icing with a small amount of water until it is the right consistency. We will not be adding any food coloring since we want white to be our base icing flood color.
Note: The key to royal icing is to get it the right consistency so that it will smooth out on the cookie but not spill all over the sides. To test your mixture, make some trails from the mixer and then give the bowl a jiggle and see if the trails settle. They should settle slowly after light jiggling. If not, then it is going to be too thick for flooding. Continue to mix in water if needed. If you have put so much water in that it no longer makes trails that stay then you might need to thicken it up with some powdered sugar.
There are actually many different ways of making these cute cookies. Some people use a stiffer icing for the borders and a very thin icing for flooding. It does depend on the cookie and the design I am going for but I generally like to border and flood with the same icing just because it is easy. So it can't be too stiff or it won't flood well and it can't be too thin or it won't make good borders. It has to be just right. When I am doing details on top of the flooding then I like to use a slightly stiffer icing so the details will hold its shape.
I also highly recommend getting some icing bottles that are made for icing. The hole on the tip is a good size but I do use some basic squeeze bottles too. Honestly, it will all work as long as you have the right consistency of icing. I should do a video on that.....but for now...
Check out Sweet Dani B HERE.
Squeeze bottles are usually found at any craft stores as well as superstores like Walmart or Smith's in the kitchen utensil or cake decorating section.
Here are the steps to making decorated sugar cookies. Before you do it on the cookies, it might be beneficial to try it on a plate to get used to the pressure needed to produce the right flow.
Step #1: Create your border.
After you have cooled cookies ready to decorate and icing in a squeeze bottle ready to pipe begin by drawing the outline of the shape you wish to "flood" with icing. This will be the base of your cookie design.
Do this by touching the beginning of the icing trail to the cookie and as you continue to squeeze lift the tip of the bottle about an inch or two off the cookie and continue your line. Lifting the bottle up off of the cookie will allow the lines to be a lot smoother. Try it! Connect the end of the icing trail to the beginning and make sure the line is solid and there are no breaks in icing.
Step #2: Flood the cookie with icing
Start on one side and squeeze the icing back and forth a few times. Use the tip of the bottle to smooth the icing out a bit so that you can't see cookie inbetween the icing lines in that area. Continue with a few more lines of icing and blend again. Continue doing this until the cookie is completely covered. When done you should see no "holes" in the icing. Pick up the cookie and give it a very gentle shake. This will even out the icing across the cookie
If you do all this and notice that the surface seems a bit uneven still, you can remedy this by adding more icing next time. I would not try to fix this cookie because the new icing may not settle properly with the old icing. Just move on....trust me. You won't even notice when you are done with all the cookies.
HINT: If you are planning on putting an edible paper on top, it is not necessary to get the icing completely smooth so don't fret if yours isn't. A little lumpiness will not even show.
Step #3: Place your edible zebra paper on the cookie.
Cut out your edible paper into the shape that will fit right onto your cookie.
Trick: Use your cookie cutter as your stencil!
The shape and size is perfect!
You can purchase edible paper at a craft store or even at walmart now for about $3.99 a sheet. Each sheet yielded 11 cookie zebra patterns (creatively placed).
Make sure you peel off the plastic backing from the paper or your cookies may be less than pleasant tasting. Carefully place the paper onto the cookie. Very lightly smooth your finger over the top of the paper to make sure all of it is touching the icing so it can stick.
Step #4: Make the Finishing Icing Border
The pink finishing icing border you see in the picture above is the same royal icing recipe, however, I took some icing out and set it aside before I thinned it out for flooding. It needs to be just stiff enough to hold its shape. If you need to thicken some royal icing you can add powdered sugar until you get the desired consistency.
Color your icing to the desired shade using water-based food coloring. Fill your piping bag with icing using the saran wrap method. I have a tutorial coming out that will be a time and sanity saver for you. I used star tip #18. You can use any size of star tip that you want keeping in mind the proportions of the cookie size. This border is a simple shell border. You squeeze and pull up then pull down and release to create the tail. On top of that tail just repeat and create another shell. Continue all the way around until you have finished your border! Let dry.
You are done!
Look how cute they are!
For the cookies above I did not use the edible paper....obviously. I just flooded with white icing then used the pink icing with the same star tip to make the E and 8.
Next.
This is my new favorite thing I have created (I am sure someone else has done this too) and I absolutely know that I will be making it again.
I call them Rock Pops!
Cake pops covered in pop rocks.
The kids flipped out for it and even the adults loved the moment of nostalgia.
I loved hearing the snaps of the pop rocks and random squeeks from the kids when a big one went off in their mouth....ok maybe that was me.
The best part is that they are super easy and fast to do!
(I just realized I have never posted my yellow cake recipe. I will do that asap in a separate post. )
Just sprinkle your cake pops with pop rocks after you dip them in the vanilla coating and while it is still wet. The pop rocks will pop in your mouth not in your coating...
Check out my previous post for directions on how to make star pops. You will want to use the cake pops that same day because the pop rocks will absorb moisture and become sticky overnight (and I live in a desert!)
The cake pops were stuck into a big trifle bowl of gumballs!
These were awesome!
What kind of party would this be without some
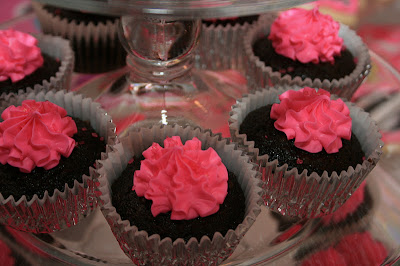
"Drop it like it's Hot Pink Cupcakes"?
A sad one...that's what kind.
These little gems turned out so cute. I love the little carnation style pom on the top of these cupcakes! It is a new decorating favorite of mine.
Of course I had to use some zebra cupcake liners for the minis as well as sprinkle with some deep pink sugar crystals.
The contrast of the bright pink buttercream frosting with the dark chocolate fudge cupcake is just awesome. It always fancies things up a bit. Totally rock star.
Secret: I used a duncan hines chocolate fudge cake mix as well as store bought buttercream frosting for these... Shhh....don't tell. Sometimes that's just what we have to do and it all turns out great!
Isn't she so cute!
The birthday girl certainly got a birthday to remember!
Subscribe to:
Posts (Atom)


