Wednesday, May 30, 2012

Luau Parasol Pops and Rice Krispie Treats {Cake Pops}

I'm not sure about you but I LOVE Spring and Summer and anything related to warmer weather.
I'm a California girl. I was raised there for a short part of my childhood and it branded itself on my inner psyche. If it weren't for my darn family that I love so much living here in Utah, I would definitely be there or at least somewhere tropical and warm all the time. I'm pretty sure I was meant to live somewhere like that. ;D  Oh, California.
{FYI: I live in Utah}
So some bad news: My brother just moved back from Mississippi and then moved out of state again!
The good news? He moved to California. :)
I hope I get to visit him some.

So in celebration of the warm weather we have been experiencing,
 I have for you some Luau Desserts.
Parasol Pops and Rice Krispie Treats
They are so bright and tropical. I love it.


Instead of using lollipop sticks, I used parasols.{Seemed quite natural} 
Just those kind that you can buy in the hundreds at any party store. Open some up (trying not to break them can be quite the feat!) and leave some closed.


I love the bright colors. Perfect for a luau!


Yes, that is snow in the background. I took these pictures a while ago. teehee.


I used Guitard Vanilla A' Peels (as always) and colored them (using OIL based food coloring gel) to get these vibrant colors. You can use pre-colored wafers if you care to go that route. There are many brands of pre-colored melting candy wafers. I do not like to use Wilton's product because it has an inferior quality to that of Guittard or Callebaut chocolate/vanilla candy coating. You can really tell a huge difference in the thickness of the shell you create on the cake pop. The Wilton brand wafers will not liquify enough to allow you to have a thin shell. They are always pretty thick. The higher quality products allow the shell to get thinner, which is much better (plus tastier). No one wants to bite into a hard thick shell of waxy tasting "chocolate". If you want a quality dessert then find the higher quality melting wafers. They actually can be cheaper too! Baking supply stores should have them and you can definitely get them online.

You can get them HERE.
This is where I get them. Orson Gygi is my Go-To baking store because they have a great variety.


For instructions on how to make these Rice Krispie Treats, see my previous post HERE.
For instructions on how to dip cake pops, see THIS post. You can use your favorite flavor of cake and frosting.


Tuesday, May 29, 2012

Lime Slush Shooters

So this post is a continuation of the Mexican Party I posted about back during Cinco de Mayo.
 {I'm very slowly getting them all posted. :P }

These are Lime Shooters.
They are very tasty.


These refreshing gems were used during the main toast of the evening.
Put a little lime slush in a custom shot glass and top off with an ounce of Tequila and you have yourself a fine toasting medium.

My little brother enjoying his lime shooter
No.... little ones should not be drinking Tequila. You're right!
 For those of us that do not drink, the lime shooters were perfectly tasty sans the alcohol so it can be used for any event!
Plus, best of all, they were super easy!!

Lime Slush Shooters

2 Bottles (59 oz x 2) Simply Limeade
2 cups Sugar

Pour Simply Limeade (or other lime beverage) into pitcher or bowl. Add enough sugar to take away the sour flavor to your liking. Stir it up. Pour the limeade into large ziplock baggies and stick in the freezer. Remove from freezer about 20 minutes before needed. Share and Enjoy.

Grab 3 for your friends!


CHEERS!


Wednesday, May 23, 2012

The Best Chocolate Cake

Chocolate Cake.
It's one of the most requested cakes I get and for good reason.
This is my "go to" Chocolate Cake and it has never failed me no matter what I want to use it for.... cake pops, cupcakes, cake, science projects.... skies the limit.
It is a rich chocolate cake with a very pure chocolate flavor.


 I have tried lots of chocolate cakes and many of them were fine but had to be paired with a good frosting to really be anything worth eating. The chocolate flavors weren't pure and it just tasted a bit "muddy" if you know what I mean. When I want a chocolate cake.... I want to taste chocolate.
With this cake, you won't even want to wait to frost it....but you should..... because this chocolate ganache is equally as good if not even better than the cake. That's right. It's a big ticket.

As Guy would say, "That's Bananas!... and bananas is good."
That's really all I have to say about this cake.
The proof is in the pudding...er....the cake. 
Enjoy.


The Chocolate Cake

Yields: 2 x 8-inch cakes

For the cake:
 2 ounces semisweet bakers chocolate, chopped
 2 ounces unsweetened bakers chocolate, chopped
 6 tablespoons water
 8 ounces (2 sticks) unsalted butter, softened
 1 ¼ cup + ¼ cup sugar
 4 large eggs, separated (Place whites in large metal or glass bowl)
 2 cups all-purpose flour
 1 teaspoon baking powder
 1 teaspoon baking soda
 ½ teaspoon salt
 1 cup buttermilk, room temperature
 1 1/2 teaspoon vanilla extract

For chocolate ganache icing:
 8 ounces semisweet chocolate, chopped
 2 tablespoons light corn syrup
 1 ½ ounces unsalted butter
 1 cup heavy cream

Prepare two 8-inch cake pans with non-stick spray and line the bottoms with rounds of parchment paper. Preheat the oven to 350°.
Melt both chocolates together with the 6 tablespoons of water. Use either a double-boiler or a microwave for about 20-25 seconds. {I use the microwave} Stir until smooth, then set aside and let cool until about room temperature.
In the bowl of an electric stand mixer, cream the butter and 1 ¼ cups of sugar until light and fluffy, about 3 minutes. Beat in the melted and cooled chocolate, then add  the egg yolks one at a time.
Mix together the flour, baking powder, baking soda, and salt.
Mix half of the dry ingredients into the creamed butter mixture, then the buttermilk and the vanilla extract, then the rest of the dry ingredients.
In a separate metal or glass bowl, beat the egg whites until they hold soft peaks. Sprinkle in the ¼ cup of sugar and beat until stiff peaks form (peak of mixture stands straight up without bending/curling).
Fold a third of the egg whites into the cake batter to lighten it, then fold in the remaining egg whites until there’s no trace of egg white visible then stop.
Divide the batter into the prepared cake pans and bake for about 40-45 minutes, until a toothpick inserted into the center comes out clean.
Allow the cake layers to cool completely and make the ganache.

To make the ganache:

Place the 8 ounces of chopped chocolate in a bowl with the corn syrup and 1 ½ ounces of butter.
Heat the cream until it just begins to boil using the microwave or stove. Remove from heat and pour over the chocolate. Let stand one minute then stir until smooth. I recommend putting it in the fridge to help it thicken quicker, however, don’t leave it in so long that it turns almost solid. Keep an eye on it and take it out of the fridge once it is at spreadable consistency. It will take a very long time and may not even thicken enough at room temperature…. Don’t know. I didn’t wait long enough to see if it would thicken.

To assemble the cake:

Remove the cake layers from the pans and cut both cake layers in half horizontally. I use a cake level and it makes for easy work and even layers. Having even layers is great for making sure your stack of cake doesn’t start leaning or become lopsided.
Place a small blob of ganache on the cardboard round or plate you will be using for the cake. Set the first cake layer on the board. The blob of ganache keeps the cake from sliding on the board. Spread enough ganache over the top to cover it with a thin layer and allow the excess ganache to fall over the sides. Set another cake layer on top.Repeat for all cake layers, including the top.
Using a large spatula, ice the sides with the chocolate ganache. When I was ready to ice the cake, my ganache was at the perfect consistency having put it in the fridge.
The chocolate ganache is absolutely delicious on this cake and I recommend using a bunch!
If you do happen to have any leftover ganache, save it for drizzling over ice cream....mmmm....

{Original Recipe from David Lebovitz}

Graduation Desserts {Cupcakes, Cake Pops, Candy}

 IT'S GRADUATION TIME!!
WAHOO!!!!
Congratulations to all you graduates out there! Way to go!
It seems like just yesterday that I was walking across the stage to collect my own diploma before getting sprayed with silly string. Oh the memories.
Those were good times and now those good times are all for you.
So, why don't you reward yourself for all that hard work with a little somethin' somethin' that was perfectly designed for YOU!
Graduation desserts of course!
These desserts are sure to start your new life of freedom off with a BANG!

First Up:
Graduation Cupcakes!

We grab our graduation cap, our diploma, throw in a few cupcake toppers and we are set for a Graduation Partay like no other!


Super Cute. Super Easy.


So to make the little graduation caps you are going to need some chocolate squares (Ghirardelli filled squares), mini Reese's peanut butter cups, small roundish candies (mini m&m or sixlets), some red Ripp Rolls or other stringy candy and some melting chocolate wafers.
First cut your Ripp Rolls into long thin tassles however long you want them to be. You can "fray" the end of the Ripp Rolls quite easily by pulling apart the little ribs for an extra cute touch. Unwrap all of your chocolate candies. You may want to refrigerate or freeze them for a short time so the wrappers don't rip the sides of the chocolate off of the candy. Melt some wafers in the microwave in a good ziplock baggie until just melted. Snip off a small tip of the corner. Place some of the melted chocolate on the bottom of the Reese's cup then place the chocolate square upside-down on top (so there is no writing on the top) and press firmly but gently. Repeat and allow all to dry. If the chocolate is clogging up the tip then just microwave it for a few seconds to remelt the chocolate. Use the chocolate melt to draw a thin line from the center of the chocolate square to the edge. Place the small candy in the center and lay the candy tassle along the line and allow to hang over the edge {Take a look at the pic}.
These are pretty heavy so I would wait until you are at the event to put them on the cupcake if you want to transport them. They may slide or shift on the frosting while transporting.


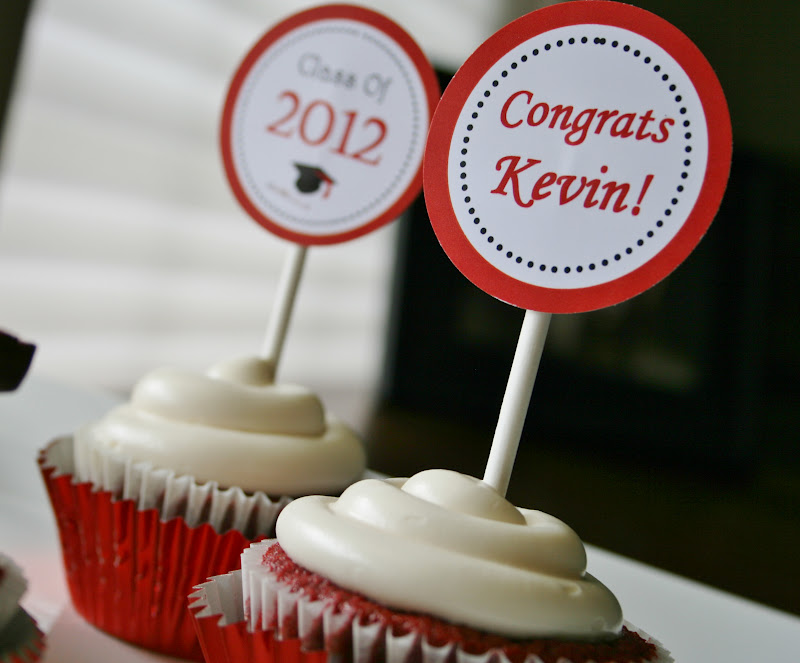
I make my cupcake toppers on Microsoft Publisher. I made the template a while back and now all I need to do is just change up the colors and details and voila! Instant deco.
I use a 2 inch round punch for the circles. All the other details are printed on the cardstock.
After I print out a sheet of these circles and punch them out, I attach them to lollipop sticks with a small round sticker on the back. You can just use tape (no one looks at the back!)
Then just insert into the middle of the cupcake!
If you have a lid that is going to go on top of your cupcake carrier box then you might want to wait to put the toppers in the cupcake until you set them up at the event so they don't get smashed.
{Would it be useful if I made a windows publisher cupcake topper tutorial?}


Look at these cute little diplomas! These are my favorite little topper for the cupcakes.
These were also super easy to make! Surprise!


Get a sheet of parchment paper (I use sheet pan sized pre-cut parchment paper sheets because it makes me feel rich when I use them and it makes things go faster and easier.) Cut the sheet into little rectangles with the width being however long you want your diplomas. Don't worry about them being perfectly straight. You won't even notice any problems when you roll them up. My rectangles were about 2" x 3".
 So here is a tip that made my life easier once I discovered this. If you cut your rectangels so that one side is slightly narrower than the other and you start rolling with the slightly longer side, you can grip the diploma much better to roll it into its tube. I really can't explain much better than that without actually showing you. Give it a try. Hopefully it makes sense. :)
Once you roll it small enough, use a long enough piece of tape to go all the way around the diploma. Tape does not stick to parchment paper so you have to put the tape all the way around to the other side where the tape is. Secure tape to tape.


Once you have all of your little diplomas rolled and taped, tie a small piece of twine or string around them. Then place them on your cupcake. So perfect!!


HERE is the recipe for my delicious red velvet cupcakes.
 As you can see, I placed my cooked cupcakes inside these red tinfoil liners.

I love them. Do it.


 So there really isn't anything quite like a delicious Pirouline.... hazelnut specifically.
They are so rich and delicious, I would not mind getting these every Christmas. =D
Don't they just look like little diplomas?!
 
 
Just tie some twine on each Pirouline and you got a diploma.
Easiest (and cheapest) diploma you will ever earn. Guaranteed.


Mmmm.......ghhhaaa.....are you drooling yet?


These were also one of my favorites of the spread. So tasty. So cute.

.
The graduee, Kevin, had some of my Rock Pops back from THIS post and had to have them for his graduation party and so a "Spark of Genius" cake pop was born just in time for graduation.
{Check out the link for a tutorial}


I used watermelon pop rocks....funny, they came in a green pouch.
It worked out because the theme color was red.
Yes, they pop in your mouth and not in the chocolate. :)
{I think there must be some chemical reaction going on because the pop rocks seem more ferocious and explosive when on a cake pop....dunno. Eat at your own risk. Ha.}


 Along with some delicious baked goods we had some red themed candy.

 Kevin loves cinnamon flavored candy so of course some Hot Tamales were in order along with some chocolate covered pomegranate seeds and red vines.


 And the table.


I didn't make these cute favors but wanted to include them in this post because they were so fun.
 These are mini Hershey bars wrapped in custom wrappers and topped with a custom tag.


Here is the other side. Cute huh!?

 
 I also did not do these beverage covers but they look so great!


Congratulations Kevin!
Thanks for letting me do your graduation desserts!
It was a blast!


 Again, Congrats everyone who graduated!
Now go somewhere and make a difference!

Tuesday, May 8, 2012

A Healthy Dessert Snack Thing I call Moxie Nosh

Hello friends. So I am totally obsessed with this treat I made.
I have been on a bit of a health food and fitness craze lately so I am just not sure if I should call it a "dessert" or "healthy snack" or what because it is natural, healthy, dang good and tastes just like cookie dough according to my nieces. I think it's better.

Meet Moxie Nosh.
I have been wanting to incorporate oats and such healthy things into my diet a little better and saw a recipe for some healthy energy bites on Pinterest which reminded me of some peanut butter balls from my childhood that had oatmeal. One thing led to another and a healthy and amazingly delicious snack was born.
Happy Birthday Moxie Nosh.

{Insert Picture HERE----> I forgot to take a picture of it so I'll make some shortly and take a pic}

I named said Moxie Nosh because....well.... it's pretty self explanatory.
Moxie = Aggressive Energy, Courage, Spirit
Nosh = A snack
This snack is full of natural ingredients that will give you the energy you need to get through the rest of your day! Plus it only takes 5 minutes to make.
I love it. I'm a fan.
Moxie Nosh
1 cup oatmeal
1/2 cup ground Quaker cinnamon oatmeal squares
Handful of chopped walnuts
1/2 cup crunchy peanut butter
1/3 cup honey
1/2 cup of small dark chocolate chips

Dump all your ingredients into a bowl and stir it up with a spoon so all the ingredients are evenly distributed and moist. Put this in the refrigerator for about 20-30 minutes (if you can resist) so it can firm up a bit. Use a very small cookie scoop (or a 1/2 Tablespoon) to portion out the mixture into ball shapes. You do not need to refrigerate this unless you want to for a stiffer texture. These balls of health will last for several days I am sure (maybe even weeks!) ..... don't know because they don't last that long if you know what I mean. Change up the ingredients and see what combos you can make into a delicious treat!

Make sure your chocolate chips are the normal small chips. My bag of chips were larger for some reason and I think it would be better with small chips. If you have the larger ones like I did, go ahead and just give them a quick chop so the chocolate pieces aren't so hard to bite into. 

You really can substitute most of these ingredients so just see what is in your pantry and use that (That's how I made this and it was amazing). I am going to be trying a million different kinds of recipes and see if I get some more winners using alternatives such as almond butter and such.

Now, these are healthy but they also have a high caloric density (30 calories in each 2 tsp serving) so don't think you can just scarf a whole tupperware full and not pay the price. The best part about this nosh is that it is actually VERY satisfying and quenches your sweet tooth and your snack tooth. It's pretty much the most awesomest thing next to my Vitamix I just bought. =D
So instead of reaching for that snickers or Reese's peanut butter cup, reach for THIS!
Be Healthy. Enjoy.

What ingredients would you put into your healthy balls of nature?

Saturday, May 5, 2012

Tres Leches Cupcakes with Dulce de Leche Frosting


Tres Leches.
Yeah. We've all heard of it.
That one cake soaked in three types of milk.
So what?....Sounds soggy to me.
Well, that was my thinking before I had a Tres Leches cupcake.
It amazes me how many things I try that I assume I will not like and then they go and blow my mind.
Boom. Mind blown.
Just goes to show I can't trust my gut anymore. I give up.
So anyway, these are real good. I have already gotten a birthday dessert request for them.
See here.
Don't those look great!
They are Tres Leches Cupcakes with a Dulce de Leche Drizzle.
The three milks in this are sweetened condensed milk, evaporated milk and coconut milk.
I love the combination of flavors in this cupcake. It just works.
I was worried that the cupcake was just going to be soggy but since it was refrigerated, it wasn't soggy at all, It has a good texture. The dulce de leche drizzle on top of the dulce de leche buttercream frosting really compliments the cupcake flavors and creates a wonderful ensemble.
Again, it just works. :)
Try them! You won't be disappointed! 
Enjoy.

Sopapilla Cheesecake Bars

So, I'll be honest.
I have never been the biggest cheesecake fan. I have only had maybe 2 that I like.
I have to have the perfect combination of flavor and texture or else it's not worth eating.
{I will be posting the recipe to one of them shortly.}

This particular recipe for Sopapilla Cheesecake Bars got really good reviews and I know the rest of the world LOVES cheesecake so I thought "Why not?" Plus it is surrounded by a deliciously flaky cinnamon sugar crust. Now THAT sounded amazing to me.
 I still did not have that high of expectations but this turned out AMAZING!
I was so pleasantly surprised when I bit into it for the first time.
I thought to myself, "If THIS is cheesecake, I can do this."
It turned out to be a favorite of many at the Mexican Taco Bar Party.


Considering how delicious this was, the prep was nothing! You bake it in a large 9 x 13" glass pan and then cut it up! That's it.
I have said this before, but please get quality ingredients. Get a good brand name of cream cheese. It makes a huge difference.
So here you go, amigos. The Recipe. 
Happy Cinco de Mayo! Enjoy. 


Sopapilla Cheesecake Bars

INGREDIENTS:
2 (8 ounce) packages cream cheese, softened
1 cup white sugar
1 teaspoon vanilla extract
2 (8 ounce) cans refrigerated crescent rolls

3/4 cup white sugar
1 teaspoon ground cinnamon
1/2 cup butter, room temperature
1/4 cup honey

DIRECTIONS:
Preheat an oven to 350 degrees F (175 degrees C). Prepare a 9x13 inch baking dish with cooking spray.
Beat the cream cheese with 1 cup of sugar and the vanilla extract in a bowl until smooth.
Open the cans of crescent roll dough and unroll the whole piece of dough. Using a rolling pin, roughly shape each piece into 9x13 inch rectangles (you can piece it together so don't stress too much about the individual pieces breaking. Press one piece into the bottom of a 9x13 inch baking dish and just make sure the whole bottom is covered with dough. Evenly spread the cream cheese mixture into the baking dish, then cover with the remaining piece of crescent dough. Stir together 3/4 cup of sugar, cinnamon, and butter. Dot the mixture over the top of the cheesecake.
Bake in the preheated oven until the crescent dough has puffed and turned golden brown, about 30 minutes. Remove from the oven and drizzle with honey. Cool completely in the pan before cutting.

{Recipe courtesy of AllRecipes. Extra directions courtesy of moi.}

Gahhhh.......now I am drooling.....


Mexican Wedding Cookies


One of the best cookies ever.
I really don't know why exactly.
It's not the kind of cookie you crave.... until it's in your mouth.

Enter The Mexican Wedding Cookie


I know. You're thinking, "I've had those. They're ok".
No.
You need to try these.
#1: These cookies are the very easiest to make.
#2: These cookies crumble in your mouth....and not in the 
"I-cooked-it-too-long-so-now-it's-crumbly" kind of way.
It melts in your mouth....like butta. {Makes sense when you see the recipe ;D }
#3: I can confidently say this is in my top 3 favorite cookies. Wow!

So without further ado. The Recipe.


Mexican Wedding Cookies
(By the by, these cookies go by many different names depending on which country you are referring to. Many countries have their own similar version.)

Ingredients

  • 1 cup unsalted butter, at room temperature
  • 1/2 cup confectioners’ sugar, plus more for coating baked cookies
  • 1 teaspoon vanilla extract
  • 1 3/4 cups all-purpose flour, plus more for dusting hands
  • 1 cup pecans, chopped into very small pieces (food processor)

Directions

Preheat the oven to 275 degrees F. Line cookies sheets with parchment paper.

Use a food processor to chop the pecans very fine (but don't run so long you get flour!). If you do not have a food processor then chop them by hand as fine as you can get them. This fine texture in the pecans is what gives you an amazing texture in the cookie.
Using an electric mixer, cream the butter and sugar at low speed until it is smooth. Beat in the vanilla. At low speed gradually add the flour. Mix in the pecans with a spatula. Using a small (1 Tbsp) cookie scoop, scoop the dough and place onto prepared cookie sheets. Bake for 40 minutes. {I baked for exactly 40 minutes twice and got perfect cookies.}. When cool enough to handle but still warm, roll in confectioners' sugar. Make sure lots of sugar gets on the whole cookie especially the bottom. Cool on wire racks. If you allow them to cool on a solid surface, the bottom will get gooey from the moisture and the sugar combining.These are amazing both warm and at room temperature.

{Recipe from Paula Dean, Queen of Butter. Extra directions added by me}

This is my new GO TO cookie recipe. It always works and is relatively fast to whip up. I keep some pecans in the freezer now and everything else I always have! Easy Peasy!
Enjoy.