
L is for the lovely lemon tarts.
O is for the oreo truffle hearts.
O is for the oreo truffle hearts.
V is very, very, extra delicious and cherry.
E is even more than any treat that you adore.
Bake is all that I can do for you.
Cake is more than just a treat for two.
Two cups sugar can make it,
Take my tart but please don't break it.
Dessert was made for me and you.

It's that time of year to show those you love just how much you really appreciate them.
There really are a million ways to show them but nothing says "I Love You"
like a homemade treat made by you with love.
Here is a quick and easy dessert you can throw together for your favorite someone
or give with Valentine notes to all you admire.
I call them Love Bars.

Pink and White really are just the cutest combo
(and even better when paired with this stand!)
So simple yet so cute.
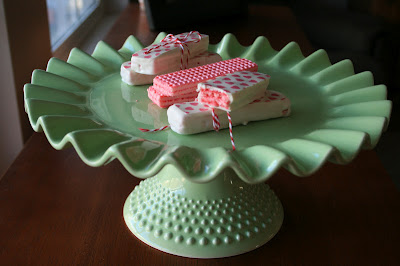
Amazingly awesome dessert stand I just can't get over provided by my Dad and MJ.
Thank you a million!
Love Bars
What you need:
Wafers (I used Strawberry because they are pink....and strawberry)
White Melting Wafers/Chocolate (I used Guittard Vanilla A' Peels from Orson Gygis)
1 Transfer sheet with Valentine design (You can get these at local craft/bakery stores or online)
Double Boiler
Dipping Tool (Can use a plastic fork with 2 middle prongs broken off)
Parchment Paper
Baking Sheet
Bring an inch or two of water in a double boiler to a simmer and then remove from heat. Place the melting chocolate in the top boiler pan and place on the bottom pan. Allow the chocolate to melt slowly and stir frequently to distribute the heat. In the meantime, place parchment paper on one or two baking sheets (depending on how many you want to make) and take your wafers out of the bag. Remove your transfer sheet from the plastic cover. Use scissors to cut the transfer sheet into the rectangle shape of the wafers. Make enough for each wafer. Try not to cut a lot of excess around the sides of the wafers because those transfer sheets can be expensive ($3-7 each 8 x 11 sheet). Once chocolate is melted, put a wafer in the melt and gently cover it with chocolate completely. Remove the wafer from the melt by placing dipping tool underneath wafer and lifting up. Allow excess to drip off back into the bowl for about 5 seconds. Very lightly scrape a little bit of the excess melt off the bottom of the wafer while transferring over to the parchment. Carefully, place the wafer on the parchment and slide tool out from underneath. (This can take a little practice but you will get it as you figure out what technique works best for you). Repeat for all of your wafers (if dipping more than 20, stop there and continue on to the next part then come back and do the rest).
Take a transfer sheet piece and gently place (cocoa butter side down- it will feel ever so slightly rougher than the top) on a covered wafer. Very lightly smooth out the surface of the transfer sheet onto the chocolate. Make sure all of the transfer sheet is touching the chocolate. Don't push hard or you will displace your chocolate and it will squish out from under the sheet. Repeat with all wafers. Allow to dry (can put in fridge if you need to speed up the process).
Once dry, carefully remove the plastic backing by lifting up on the plastic and slowly peeling back from chocolate. Make sure you remove the plastic from ALL the wafers. It is usually clear so don't forget any!

See the plastic? Exactly.....make sure you remove it because your love peeps won't!
Tie two Love Bars together with some pink or red twine
and attach a Love Tag to it for an extra little touch. There you have it.
Love Bars.

These were SUPER Yummy. More than I even thought! You need to try them....now.
You can jazz them up with any transfer sheet for any occasion.
Enjoy.

No comments:
Post a Comment