This party idea was cute as a button!
No. Really... it was a cute as a button party.
This theme was really fun and the buttons were way fun to make!

It was for a first birthday party. Very fitting.
I did a big fondant cake, button cookies, and cupcakes.

To make the button cookies, simply make round rolled sugar cookies (recipe found HERE). The button is made of a fondant circle so just use the same cookie cutter to cut out the fondant and then poke button holes using the end of a decorating tip. Wet the back of the fondant slightly so it becomes slippery and then put it on the cookie and tap down lightly. Allow to dry and it will stick very well.

The cupcakes and cake were made of yellow cake (the BEST ever yellow cake recipe found HERE) and yellow vanilla buttercream frosting with little decorative fondant buttons. Awwww,,,,, fer cute.

To get the ruffles, use a petal tip with the small end facing out. Spin the cupcake while applying even pressure to your pastry bag and move the tip up and down. When coming back around to where you have already piped the icing just continue on top of that layer and continue the ruffles until you come to the middle. Take a few tries doing a ruffle before going to your cupcake.
To get the plain swirl use a large round tip (I think this one was a half inch) and starting in the middle of the cupcake cover the whole bottom in a swirl and then continue on top of that swirl and then again once more. Top it with a few cute buttons and done. Magnifique!

Now for the big boy. The cake.
So
I am no master of fondant but I got 'er done and you definitely can to
if you choose to go this route. Here are a few tidbits for you to make
sure it goes as smoothly as possible. I have seen many different methods of applying fondant so here is how I did it.
First off, bake your cake. This one was a 4 layer 8 inch cake. I actually did 2 purple layers and 2 white layers alternated so you got a pretty surprise when you cut into it. Then layer it up with frosting in between the layers. Cover the whole cake in a crumb coat and stick it in the freezer if possible or else just the fridge will do. Get it really cold so the buttercream doesn't smear easily. You are now ready to put fondant on your cake.

I used Satin Ice white fondant that comes in tubs of different sizes. It's kind of pricey so you can also make your own but it's messy. I'll have to try it again sometime to see if it's worth it. I only did it once and it was back before I really got into baking seriously. Anyway...
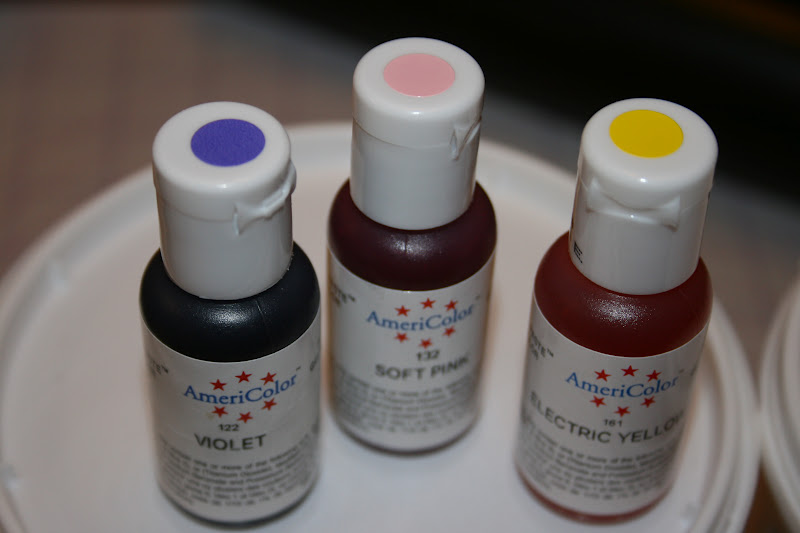
When tinting your fondant use water-based concentrated food gel (also
called icing food coloring). You can always add more but you can't make
it lighter unless you have enough to add more white fondant, so keep
that in mind. You can get gel coloring at craft or baking supply stores.
Walmart actually has some too in their specialty baking section by the
wedding stuff. These (see below) are the colors I used (Violet, Soft Pink, Electric
Yellow). Poke a small hole or indent into the fondant ball and then fold
it over on itself so the color doesn't get all over. You might want to
use gloves if you don't want your hands to get dyed. Knead the fondant
until the color is evenly dispersed. Try to do it fairly quickly and
don't let the fondant sit out because it dries out VERY quickly. This
is the bane of my existence with regards to fondant. I think it is the
toughest part of using fondant. So just try to work quickly. When you
aren't using it, put it in an airtight bag or container.
I
bought this fondant mat to help me measure how big I needed to roll my fondant and it was definitely a good purchase. When using these it is recommended to rub the top with a very small amount of shortening to "season" it and make it more non-stick.

This was a big cake (I know...this is no wedding cake but for someone with next to zero fondant experience, this definitely made things trickier than it would have been had it been a smaller cake.) You want to measure the top and sides of the cake to see how large the diameter of your fondant circle needs to be. Add about an inch on each side to give yourself some wiggle room and find that number on the mat. You don't need to roll the fondant in a perfect circle but you need to cover that line around the whole mat. Make sure you have plenty of fondant to work with. That will also make your life easier. You can use the extra that you cut off for something else... like the buttons. Fancy that.

This was a big cake (I know...this is no wedding cake but for someone with next to zero fondant experience, this definitely made things trickier than it would have been had it been a smaller cake.) You want to measure the top and sides of the cake to see how large the diameter of your fondant circle needs to be. Add about an inch on each side to give yourself some wiggle room and find that number on the mat. You don't need to roll the fondant in a perfect circle but you need to cover that line around the whole mat. Make sure you have plenty of fondant to work with. That will also make your life easier. You can use the extra that you cut off for something else... like the buttons. Fancy that.
So, when you are rolling it out, do so very quickly or else you will get what is called elephant skin on your fondant. This is where the top of the fondant dries out and as you try to handle it it streches and looks like elephant skin like so.
 |
| Picture located HERE |
Roll it pretty thin but not so thin that it will tear when handling (decide based on your own comfort level). I rolled it too thin the first time and it tore so I kept it a little thicker the second time. I would recommend watching a few youtube videos before you try so you don't destroy your fondant. Some people use shortening on the fondant to keep it from sticking. I did not do that but maybe it would have made it easier. I'll try it next time.
Fondant is actually really fun to work with aside from the frustration that can occur so it would be really fun to be really good at fondant because it so pretty and I really like the look of it.

So form your fondant ball into a smooth ball and flatten it slightly and start rolling it out. You don't want any creases on top so make sure there aren't any before starting to roll. Roll it out quickly until it is as thin as you want. Now you can roll it up on your rolling pin or just stick your arms underneath it (I did this) and transfer it to your cake. Make sure you set it down right where you want it to stay. Get the middle of your fondant onto the middle of the cake. You can't slide it around on the cake.... it will likely destroy your cake (Having it frozen helps). You have to lift it off completely and then reset it if necessary. If you get buttercream all over your fondant and then have to completely start over... that's not good. You need to scrape off as much of the buttercream as possible, especially if the color of the buttercream will change the color of your fondant. What I am trying to say is do it right the first time.... and do it quickly. :) Easier said than done. It takes practice to do a good job.

So now quickly smooth the top of the fondant on the cake so it is level. Sometimes the buttercream will get distorted and smooshed so just make it level now that the fondant is in place. You can use your hand/fingers or a fondant trowel but just make sure to keep it light so you don't get dents and divots. Those will be there forever. :) now quickly smooth over the sides. You can make the corner sharp or smooth. It's up to you. I kept this one smooth and I like it a lot. Now on the sides lift the bottom of the fondant very slightly away from the cake and take your other hand and smooth the fondant onto the side of the cake. Go around the cake continually smoothing the fondant lower on the cake until you reach the bottom. This is the hard part. I always get wrinkles. You can smooth them out after they are there. Again, they are there forever. I need to practice more and then I can give you tips but until then I will have to refer you to youtube. Luckily....many fondant cakes have thick ribbons on the bottom because they just look beautiful so that hides most of the wrinkles.
Lucky me. :)
So now place your ribbon on your cake. I like to use long pins. Just take them out before you cut into the cake and eat. :) You should be taking off the ribbon too... unless you made an edible one.
Now you are ready for the fun part! The buttons!

The buttons on the cake were the funnest and easiest part of the whole process. I separated my fondant into 3 balls and dyed them different colors. I used a mini fondant roller with a spacer (the little rubber band like thing that keeps the thickness even when rolling) to roll out a sheet of fondant. I then actually just used my icing decorating tips to get the different sizes of holes and designs (using both the small and large ends). I even used the "hair/grass" tip for a fun decorative button. That's it! I left them on a cookie sheet covered in parchment paper for them to firm up a bit before I man-handled them onto the cake.

They will not harden. That's where gum paste comes in...

If you want to make a decoration that hardens and can "stand up" on a cake like this number 1, then you need to involve gum paste. Gum paste hardens when left out. Fondant just gets chewy and becomes less elastic but will not harden enough to stand up on its own. You can use all gum paste or do a 50:50 mix of fondant and gum paste. Ether should work fine (depending on the humidity in your local area so make it ahead of time just in case. This is usually not eaten so it will last until you destroy it or the elements do.) I mixed the fondant and gum paste together and then tinted it to the color I wanted, rolled it out to a thickness where I wasn't worried it would accidentally break and then cut it. I drew a number 1 on a piece of paper the way I wanted it and then cut it out, placed it on top of the rolled out fondant and used a knife to cut it out. Be careful cutting on the fondant mat. It is not meant to be cut on. Once it was cut out I just let it harden overnight. Voila!
One thing you actually don't see in the picture above is that when I was cutting out the number 1, I left a piece on the bottom that would let me stick it into the fondant so it would stand straight up. Kind of like so.... :)

I love paint. :)
Use a knife to cut a small slit into the cake and then insert the number 1. When you are ready to place your buttons, slightly wet the back side and apply it to the fondant. Smooth it out.You can place them however you want to. Cake is done!
With regards to refrigeration. I personally do not have experience because I have not refrigerated my fondant cakes. However, I have heard that Wilton fondant does not refrigerate well while Satin Ice does. It depends on the humidity of your fridge as well. Refrigeration right after you put on the fondant can prevent bulges and allow the cake to keep its shape but may also produce sweating. Bulging can definitely be an issue in fondant cakes. So if it is a really important cake then you may want to give it a trial run in your own elements and conditions first.
So there you have it.
Awww....

The perfect party theme for your cute little button.

No comments:
Post a Comment